
Tile roofs offer durability and a distinct aesthetic, making them a popular choice for many homes. When adding a solar energy system to a tile roof, the installation process requires special attention. Unlike standard asphalt shingles, tiles are more fragile and have unique shapes that present challenges. A proper installation is critical to prevent leaks, protect your roof's integrity, and ensure your solar array performs optimally for years. Understanding the common pitfalls can help you safeguard your investment and achieve energy independence without compromising your home's structure.
Understanding the Anatomy of a Tile Roof
Before looking at installation errors, it's important to know how a tile roof works. The tiles are the first line of defense against the elements, but the primary waterproofing barrier is the underlayment beneath them. This layered construction is key to its longevity but also adds complexity to solar installations.
Types of Tiles
Roofing tiles come in various materials, including clay, concrete, and slate. Each has a different level of fragility and profile (shape), such as flat, S-shaped, or W-shaped. Concrete tiles are generally robust, while clay and slate can be extremely brittle and require careful handling to avoid breakage. The specific shape dictates the type of mounting hardware required.
The Importance of Underlayment and Flashing
The underlayment is a waterproof membrane that sits on the roof decking. It catches any water that gets past the tiles. Flashing is the metal material used to direct water away from penetrations like vents, chimneys, and, in this case, solar mounts. A compromised underlayment or improperly installed flashing are primary causes of roof leaks.
Mistake 1: Drilling Directly Through Tiles
One of the most damaging errors is drilling attachment bolts directly through the roof tiles. This approach creates concentrated stress points, which almost inevitably leads to cracked tiles, either immediately or over time due to thermal expansion and wind-induced vibrations.
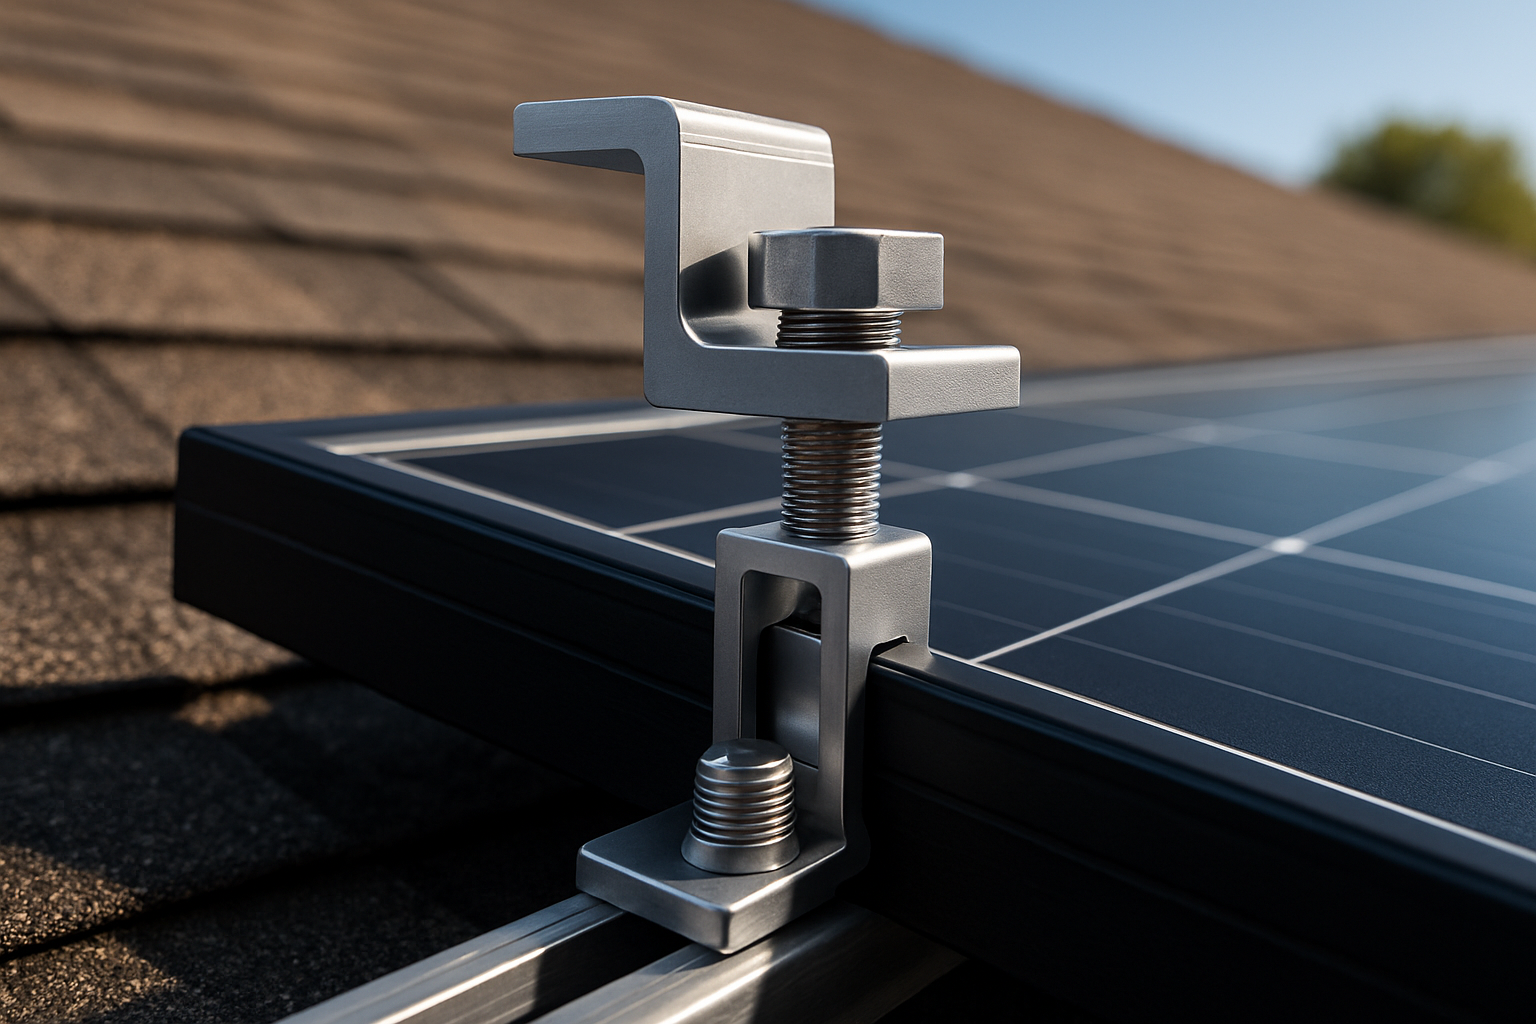
The Correct Method: Flashed Mounts
The proper technique involves removing a tile, attaching a mount directly to a roof rafter, and installing flashing over the attachment point to create a watertight seal. The tile is then either cut precisely to fit around the mount or replaced with a specialized flashed mount that integrates seamlessly. This method transfers the load to the roof's structure without stressing the fragile tiles.
Mistake 2: Improper Flashing or Sealing
Relying on sealants like silicone as the primary waterproofing method is a recipe for failure. Sealants degrade over time when exposed to UV radiation and weather, leading to leaks. The physical barrier of flashing is the only reliable long-term solution.
Common Flashing Errors
Using the wrong type of flashing for the tile profile or installing it incorrectly can channel water into the roof instead of away from it. Every penetration must be sealed with high-quality flashing and a compatible sealant as a secondary barrier. This creates a durable, multi-layered defense against water intrusion.
Mistake 3: Ignoring Rafter Locations
The weight of a solar array, combined with wind and snow loads, is significant. Attaching mounts only to the roof decking or sheathing is insufficient, as these materials are not designed to bear such concentrated loads. This can lead to sagging, damage, and potential roof failure.
How to Properly Attach to Rafters
Installers must locate the structural rafters and use appropriately sized lag bolts to anchor the mounts securely. This ensures the weight of the entire system is transferred directly to the building's frame, providing the necessary strength to withstand environmental forces for decades.
Mistake 4: Mismatched Mounting Hardware
A one-size-fits-all approach does not work for tile roofs. Using hardware designed for asphalt shingles or the wrong type of tile profile will result in a poor fit, broken tiles, and an insecure array.
Tile-Specific Hooks and Mounts
A variety of specialized hooks and mounts are available for different tile profiles. Flat tile hooks have a low profile, while S- and W-hooks are shaped to fit the unique curves of those tiles, ensuring a secure fit without damaging them. According to the International Energy Agency's report, Solar PV Global Supply Chains, mounting structures often use materials like aluminum and galvanized steel, and it's vital that all components are compatible to prevent issues like galvanic corrosion.
Mistake 5: Neglecting Weight Distribution and Load
Before any work begins, a professional should conduct a structural assessment of the roof to ensure it can support the additional weight of a solar system. Most modern roofs are built with enough of a safety margin, but older homes or those with existing heavy loads may need reinforcement.
Spacing Mounts for Optimal Load Bearing
The layout of the mounting feet is crucial for distributing the system's weight evenly across the roof structure. Following manufacturer specifications and engineering guidelines ensures that no single point is overloaded. This is a key part of a safe and compliant installation.
Mistake 6: Using the Wrong Tools
Working with tile requires more than just a standard toolbelt. Using improper tools for cutting or grinding tiles can easily lead to chipping, cracking, and excessive breakage, increasing project costs and compromising the roof's integrity.
Specialized Tile Tools
Professionals use diamond blades on angle grinders or specialized tile cutters to make clean, precise cuts. They also know how to walk on a tile roof without causing damage—by stepping on the lower part of the tiles where they overlap and are supported by the structure below.
Mistake 7: Poor Wire Management
Exposed cables lying directly on the roof surface can degrade from UV exposure and abrasion. Worse, improperly sealed conduit penetrations can create direct pathways for water to enter the attic.
Securing and Sealing Conduits
All exterior wiring should be run through UV-resistant conduit. Where the conduit passes through the roof, a proper flashing, such as a dektite, must be used to create a permanent waterproof seal. Wires under the panels should be secured to the racking with durable clips, preventing them from touching the abrasive roof surface.
Your Path to a Secure Solar Investment
Installing solar panels on a tile roof is a specialized task that demands precision, the right materials, and a deep understanding of roofing construction. Avoiding these seven common mistakes is fundamental to a successful, leak-free installation that protects both your home and your energy system. A properly mounted array is the foundation for achieving optimal energy production. To understand how this physical setup impacts your system's output, you can review this ultimate reference for solar storage performance, which details the factors influencing efficiency. Ultimately, a meticulous installation ensures your move toward energy independence is built on a secure and lasting foundation.
Frequently Asked Questions
Can solar panels be installed on any type of tile roof?
Solar panels can be installed on most tile roofs, including clay, concrete, and slate. However, the process is more complex and requires specialized hardware. Extremely brittle tiles, like slate, demand the highest level of expertise to prevent breakage during installation.
Is it more expensive to install solar on a tile roof?
Yes, installations on tile roofs are typically more expensive than on standard asphalt shingle roofs. The increased cost is due to the additional labor required to remove and work around the tiles, as well as the need for specialized mounting hardware and flashing to ensure a leak-proof result.
Will installing solar panels void my roof warranty?
It can, depending on the terms of your warranty and the quality of the installation. It is crucial to check with your roofing manufacturer beforehand. Hiring a certified and reputable solar installer who provides a workmanship warranty is the best way to protect yourself. A proper installation should not cause damage or lead to leaks that would affect your original roof warranty.
Leave a comment
All comments are moderated before being published.
This site is protected by hCaptcha and the hCaptcha Privacy Policy and Terms of Service apply.