
As a professional who designs and installs Energy Storage Systems (ESS), I can tell you that the wiring phase is where safety and performance are truly defined. A well-executed wiring plan is the backbone of a reliable system that will protect your investment and family for years. What follows is the exact 7-step process I use on every project, from initial design to final commissioning. Think of it as a blueprint for ensuring your system is safe, efficient, and serviceable.
Step 1: Planning & System Design (The Blueprint)
I never touch a wire without a complete electrical one-line diagram and wiring schematic. This plan is the single source of truth for the entire project. It translates your energy goals into a concrete, code-compliant design.
- Load Analysis: We begin by defining the daily kWh needed, peak kW demand, and a clear list of critical loads.
- Schematic Details: The diagram must specify every conductor size, the rating and location of all overcurrent protection devices (OCPDs), disconnects, and grounding points.
- Code & Manuals: The entire design must align with manufacturer installation manuals and local electrical codes, such as the NFPA 70 (NEC) in the U.S.
Step 2: Sizing Conductors, OCPDs & Disconnects
I treat any generic wire-sizing table as illustrative only. Real-world ampacity depends on many factors, including insulation rating, ambient temperature, and how many wires are bundled in a conduit. All sizing must be done per code.
- Conductors: Use sunlight-resistant PV cable for any outdoor runs. Use listed, finely stranded battery cables for the high-current DC connections. Pay close attention to temperature ratings.
- Overcurrent Protection: DC circuits require DC-rated fuses or breakers. AC circuits require AC-rated devices. They are not interchangeable.
- Disconnects: I ensure there are clearly labeled, lockable disconnects for the PV array, the battery, and the AC output to allow for safe servicing.
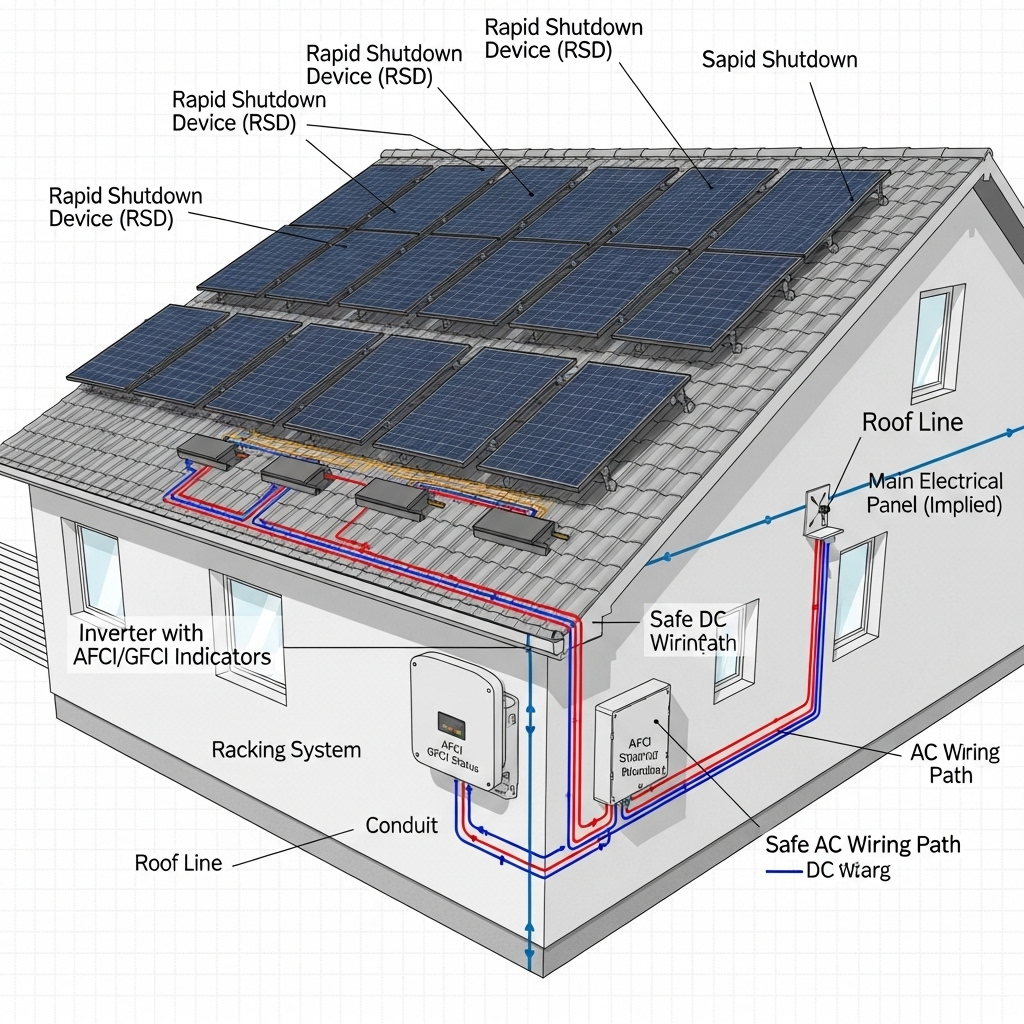
Step 3: DC String & Combiner Wiring
On the roof, precision is key. I document the array's voltage (especially the maximum cold-weather Voc), current, and wire run distances to ensure we are well within the inverter's operating window.
- Connectors & Torque: Use listed PV connectors (like MC4-type) and always torque terminal lugs to the manufacturer's specification. A loose connection here will eventually fail.
- Cable Protection: All exterior wiring must be protected in conduit or a listed raceway. I use strain relief and drip loops to prevent water intrusion.
Step 4: Battery-to-Inverter High-Current DC Wiring
This is the most dangerous connection in the entire system, carrying hundreds of amps. There is no room for error here.
- Polarity Discipline: I use a multimeter to verify polarity at least three times before mating any high-current connection. Reversing polarity will instantly destroy the inverter's electronics.
- Battery Disconnect: A listed, high-amperage DC breaker or fused disconnect must be installed between the battery and the inverter. This is a critical safety device.
- Lugs & Cables: I use a hydraulic crimper with the correct dies for all battery lugs, cover them with heat-shrink tubing, and support heavy cables to prevent strain on the terminals.
Step 5: AC Side & Breaker Integration
Connecting to the main service panel is where the system meets the grid or home loads. In most jurisdictions, this step must be performed by a licensed electrician.
- Dedicated Breaker: The inverter's AC output connects to a dedicated breaker in the main panel. Its size must match the inverter's output and comply with all load-side or supply-side connection rules.
Step 6: Grounding & Bonding
This is a non-negotiable safety system. Its job is to provide a safe path for electricity to flow during a fault, preventing metal surfaces from becoming energized.
- Equipment Grounding: Every metal component—panel frames, racking, inverter chassis, and enclosures—must be bonded together and connected to the grounding electrode system.
- Grounding Electrode: I verify the connection to a proper grounding electrode (like a ground rod) is secure, protected from physical damage, and sized according to local code.
Step 7: Final Checks & Commissioning
Before a single switch is flipped, I perform a methodical series of checks and document everything on a commissioning sheet with photos.
- Polarity Check: Meter all DC circuits one last time and record the voltages.
- Torque Check: Re-verify the torque on all critical terminals (inverter, battery, breakers).
- Continuity Check: Confirm the integrity of the grounding and bonding paths.
My startup sequence is always the same: **1. Battery disconnect ON** (let the inverter boot up). **2. PV disconnect ON.** **3. AC breaker ON.** I then monitor the system's vital signs—voltages, currents, temperatures—for at least an hour.
A Final Word on Safety
This process provides a framework for a professional installation. Remember these critical safety boundaries:
- Always de-energize and verify circuits are dead before working on them. Use lockout/tagout procedures.
- Never substitute AC breakers for DC circuits or vice-versa. They are not the same.
- When in doubt, stop and hire a licensed electrician. Your safety is worth more than the project.
Disclaimer: This article is for informational purposes. All electrical work is hazardous. Always follow manufacturer instructions and local electrical codes, and consult a licensed electrician.

Leave a comment
All comments are moderated before being published.
This site is protected by hCaptcha and the hCaptcha Privacy Policy and Terms of Service apply.