
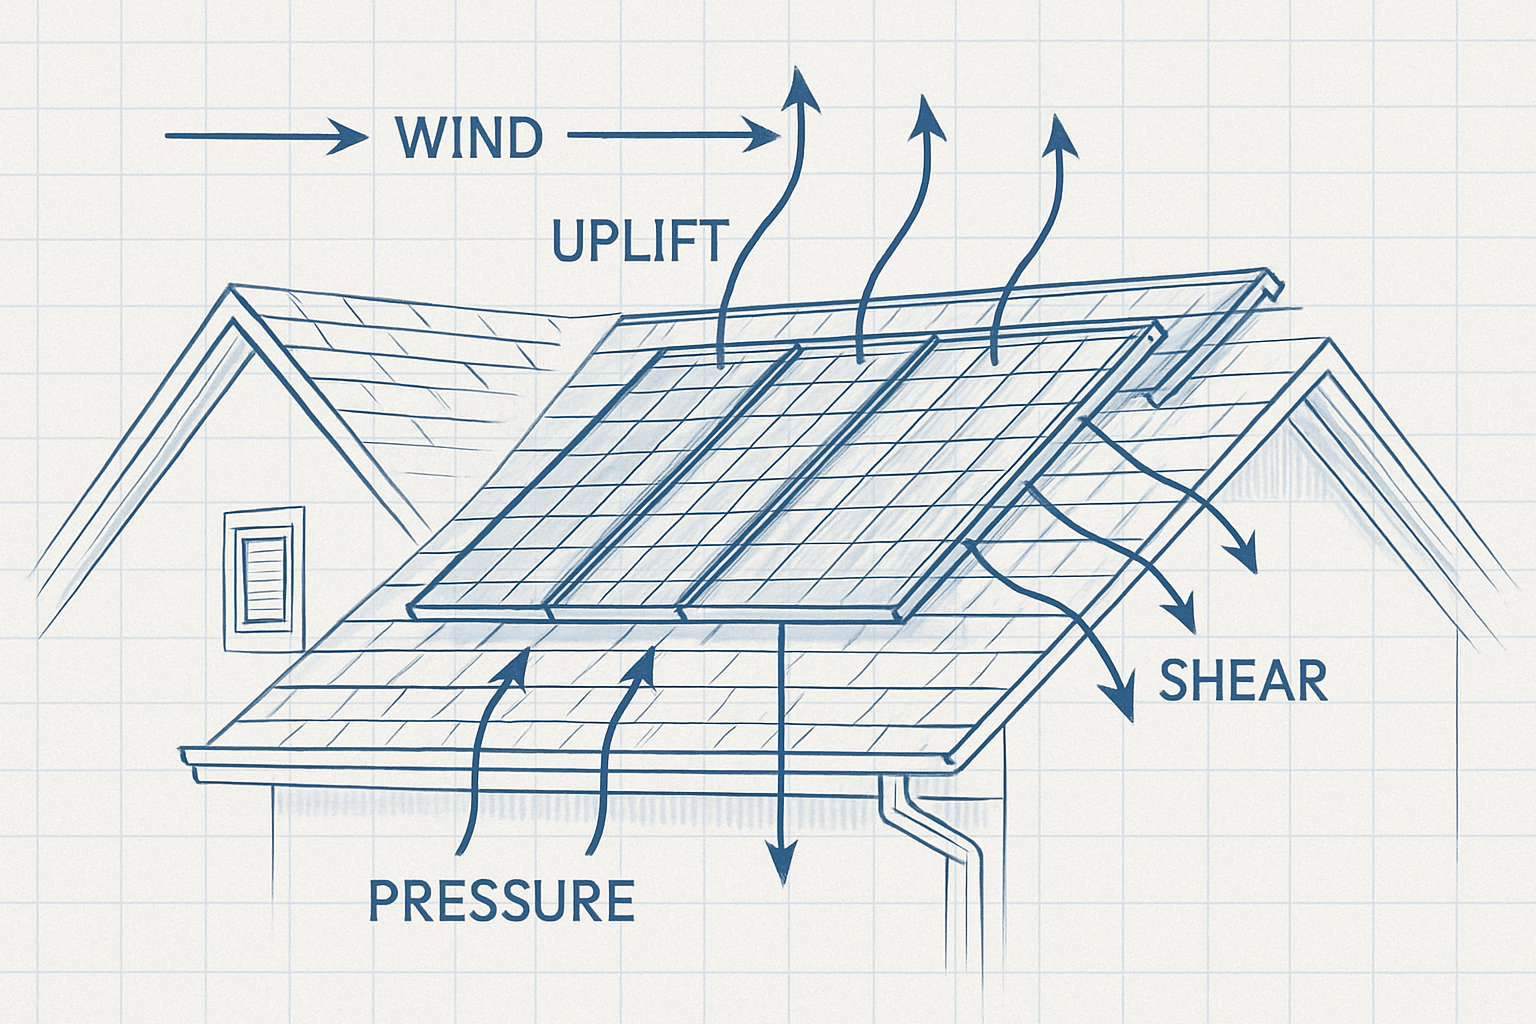
Choosing the correct anchor for your solar panel installation is a critical decision. It is the foundational connection that secures your energy investment to your home, ensuring safety, longevity, and performance. Using the wrong hardware can lead to roof leaks, structural damage, and system failure. This guide provides clear answers on selecting the appropriate anchors for the three most common residential roofing materials: asphalt shingle, tile, and corrugated metal.
Anchoring Solar Panels on Asphalt Shingle Roofs
Asphalt shingle is the most prevalent roofing material in North America, and a standardized mounting method exists to ensure a secure and watertight installation.
Understanding the Structure of Shingle Roofs
A shingle roof consists of several layers: the shingles themselves, an underlayment for weatherproofing, and the roof deck (typically plywood or OSB). Crucially, the structural support comes from the rafters or trusses beneath the decking. Any solar mounting system must be anchored directly into these structural members, not just the decking, to handle wind and snow loads effectively.
Primary Anchor Type: Flashed Mounts
The industry-standard solution for shingle roofs is a flashed mount. This system involves a lag bolt driven through the roof decking and securely into a rafter. A piece of flashing, typically aluminum, is then installed around the anchor point. This flashing slides up and under the shingle course above the penetration, using the roof's natural water-shedding design to direct moisture away from the hole. An L-foot or a standoff is then attached to the anchor, which connects to the racking rails.
Installation Best Practices
Proper installation is paramount. Always locate the center of the rafters before drilling. A pilot hole ensures the lag bolt drives straight and true. The flashing must be layered correctly with the shingles to function as intended. While a high-quality sealant should be applied to the penetration point as a secondary barrier, the mechanical flashing provides the primary, long-term waterproofing. Relying on sealant alone is a common but critical mistake.
Securing Mounts on Tile Roofs
Tile roofs, whether clay, concrete, or slate, present a unique challenge due to their brittle nature and the irregular surface they create.
The Challenge of Tile Roofs: Brittleness and Gaps
The primary rule for tile roofs is to avoid drilling through the tiles. Their composition makes them susceptible to cracking under the pressure of drilling or the point load of a mount. Furthermore, there is an air gap between the tiles and the roof deck, which must be accounted for by the mounting hardware.
Common Anchor Solutions: Tile Hooks and Replacements
Two main types of anchors are used for tile roofs:
- Tile Hooks: These are the most common solution. A tile hook is a flat, sturdy piece of stainless steel or aluminum with a hook or bend at one end. The installer removes or slides a tile up, fastens the base of the hook directly to the rafter, and then reinstalls the tile over the base. The hook portion then protrudes from underneath the tile, providing a secure attachment point for the racking without any penetration of the tile itself. Different hook shapes are available to match flat, Spanish (S), and W-shaped tile profiles.
- Tile Replacement Mounts: This solution involves removing a tile and replacing it with a specially shaped mount that has a built-in flashing and post. This 'replacement tile' integrates directly with the surrounding tiles and provides a robust, waterproof anchor point.
Critical Techniques to Prevent Damage
Working with tile requires care. If a tile needs modification to fit around a hook, it should be carefully ground or cut, not forced. The hook should not create a pressure point on the tile above or below it, which could lead to cracking over time from thermal expansion and contraction. Waterproofing at the deck level, where the hook is bolted down, remains essential.
Mounting Systems for Corrugated Metal Roofs
Corrugated metal roofs are durable and well-suited for solar, provided the correct mounting hardware is used to match the roof's profile.
The Anatomy of a Corrugated Metal Roof
These roofs are defined by their repeating pattern of ridges (crests) and valleys. The key to a successful installation is to work with this profile, not against it.
Anchor Options: Profiled Brackets and Hanger Bolts
The preferred method for corrugated roofs involves using specialized mounting brackets that are shaped to fit the specific profile of the metal panels. These brackets are attached to the crest of the corrugation, which keeps the penetration point elevated from the main channel of water flow in the valleys. These brackets are typically secured with self-tapping screws that have a bonded EPDM rubber washer, which creates a durable, long-lasting seal when compressed. Hanger bolts can also be used, but they must be paired with a block or bracket that sits on the ridge and provides a stable, sealed surface.
Ensuring a Watertight Seal
For corrugated metal, the EPDM sealing washer is the most critical component for waterproofing. As the screw is tightened, the washer compresses to form a tight seal against the metal surface. Attaching to the high point of the profile is a fundamental best practice, as water will naturally flow away from the penetration. Applying an appropriate sealant can offer extra protection but should not be a substitute for a properly installed mechanical seal.
Comparative Analysis and Load Considerations
The choice of anchor is dictated by the roof material. Each system is engineered to provide a secure attachment while preserving the integrity and waterproofing of the roof.
| Roof Type | Primary Anchor | Key Challenge | Best Practice |
|---|---|---|---|
| Asphalt Shingle | Flashed Mount with Lag Bolt | Waterproofing the penetration | Layer flashing under upper shingle course; anchor to rafters |
| Tile | Tile Hook or Tile Replacement Mount | Tile brittleness and avoiding breakage | Never drill through tile; attach hook directly to rafter |
| Corrugated Metal | Profiled Bracket with Sealing Screws | Matching roof profile and sealing | Attach to the crest (high point), not the valley |
A robust mounting system is crucial, but its effectiveness is tied to the energy system it supports. Understanding key metrics like Depth of Discharge (DoD) and C-rate, as detailed in this ultimate reference on solar storage performance, helps in designing a holistic and efficient system from the roof down. According to the U.S. Department of Energy's Building America Solution Center, all roof penetrations must be properly flashed and sealed to ensure the roof's integrity.
A Forward Look: The Foundation of Energy Independence
Selecting the right roof anchor is not a minor detail; it is the foundation of your entire solar energy system. An installation on any roof type—shingle, tile, or metal—can last for decades without issue when the correct, material-specific hardware is used. By matching the anchor to the roof, you ensure the structural integrity of your home, prevent costly water damage, and secure the long-term performance of your solar array, moving you one step closer to reliable energy independence.
Disclaimer: This article provides general information and is not a substitute for professional engineering or installation advice. Always consult with a qualified solar installer and adhere to local building codes and manufacturer specifications.
Frequently Asked Questions
Can I install solar anchors myself?
While it is possible for individuals with significant roofing and construction experience, professional installation is strongly recommended. Working on a roof carries inherent safety risks, and improper installation can lead to leaks and structural damage. Professionals have the correct safety gear, specialized tools, and knowledge of local codes to ensure a secure and compliant installation.
Do I always have to anchor into a rafter?
Yes, for nearly all standard solar installations, anchoring into a structural member like a rafter or truss is mandatory. The roof decking alone is not strong enough to withstand the combined weight of the panels and the forces exerted by wind and snow over many years. Structural attachment is essential for safety and longevity.
How do I find the rafters under my roof?
Several methods can be used. If you have attic access, you can measure the rafter locations from inside. From the rooftop, you can sometimes identify rafter lines by looking for rows of nails. A high-quality electronic stud finder can also be effective. Rafters are typically spaced at regular intervals, such as 16 or 24 inches on center, which can help in locating them once the first one is found.
What happens if a tile breaks during installation?
It is wise to have several spare matching tiles on hand before beginning any work on a tile roof. If a tile cracks or breaks during the installation process, it must be carefully removed and replaced immediately. Leaving a broken tile in place will compromise the roof's ability to shed water and will almost certainly lead to a leak.

Leave a comment
All comments are moderated before being published.
This site is protected by hCaptcha and the hCaptcha Privacy Policy and Terms of Service apply.