
In any solar power project, the solar panels and inverters often receive the most attention. Yet, the Balance of System (BOS) components—everything else from wiring and conduits to connectors and mounting hardware—are where hidden costs can accumulate. These seemingly small parts play a huge role in your system's efficiency, safety, and total price. Overlooking them can lead to significant wiring and labor cost inflation. This overview identifies seven common BOS mistakes and provides clear strategies to avoid them, helping you optimize your investment and achieve energy independence more effectively.
Mistake 1: Mismatching System Voltage and Component Selection
The voltage of your system is a foundational decision that has a ripple effect on costs, particularly for wiring. Many people underestimate how much this choice matters.
The High Cost of Low Voltage
A common error, especially in smaller or DIY setups, is defaulting to a low-voltage architecture like 12V. According to Ohm's Law (Power = Voltage x Amperage), a lower voltage requires a higher amperage to deliver the same amount of power. Higher amperage demands thicker, more expensive copper wiring to handle the current safely and prevent overheating. This single decision can dramatically increase your material expenses.
How Higher Voltage Saves Money
Opting for a higher system voltage, such as 48V, significantly reduces the required amperage for the same power output. This allows you to use thinner, less costly wiring throughout your system. Thinner wires are also easier to handle and route, which can reduce the time and effort involved in installation, leading to direct labor cost optimization.
Mistake 2: Improper Wire Sizing and its Hidden Dangers
Choosing the correct wire gauge is a critical step for both safety and performance. Getting it wrong can cost you in more ways than one.

The 'Just Good Enough' Fallacy
Using a wire gauge that is too small for the current it needs to carry is a serious safety risk. Undersized wires can overheat, melt their insulation, and create a fire hazard. Beyond the danger, they also cause significant voltage drop, which means less power reaches your appliances and batteries. This inefficiency undermines the very purpose of your solar investment.
The Solution: Calculate and Comply
Always use a reliable wire sizing calculator and adhere to local electrical codes. These tools help you select the appropriate gauge based on amperage, the length of the wire run, and the maximum acceptable voltage drop (typically under 3%). Investing a few extra minutes in proper calculation prevents costly energy losses and dangerous failures. As various reports on electricity generation costs show, efficiency at every stage is key to making renewable energy economically viable. For instance, the IEA's report on Projected Costs of Generating Electricity 2020 highlights how operational efficiencies contribute to the overall levelised cost of electricity (LCOE).
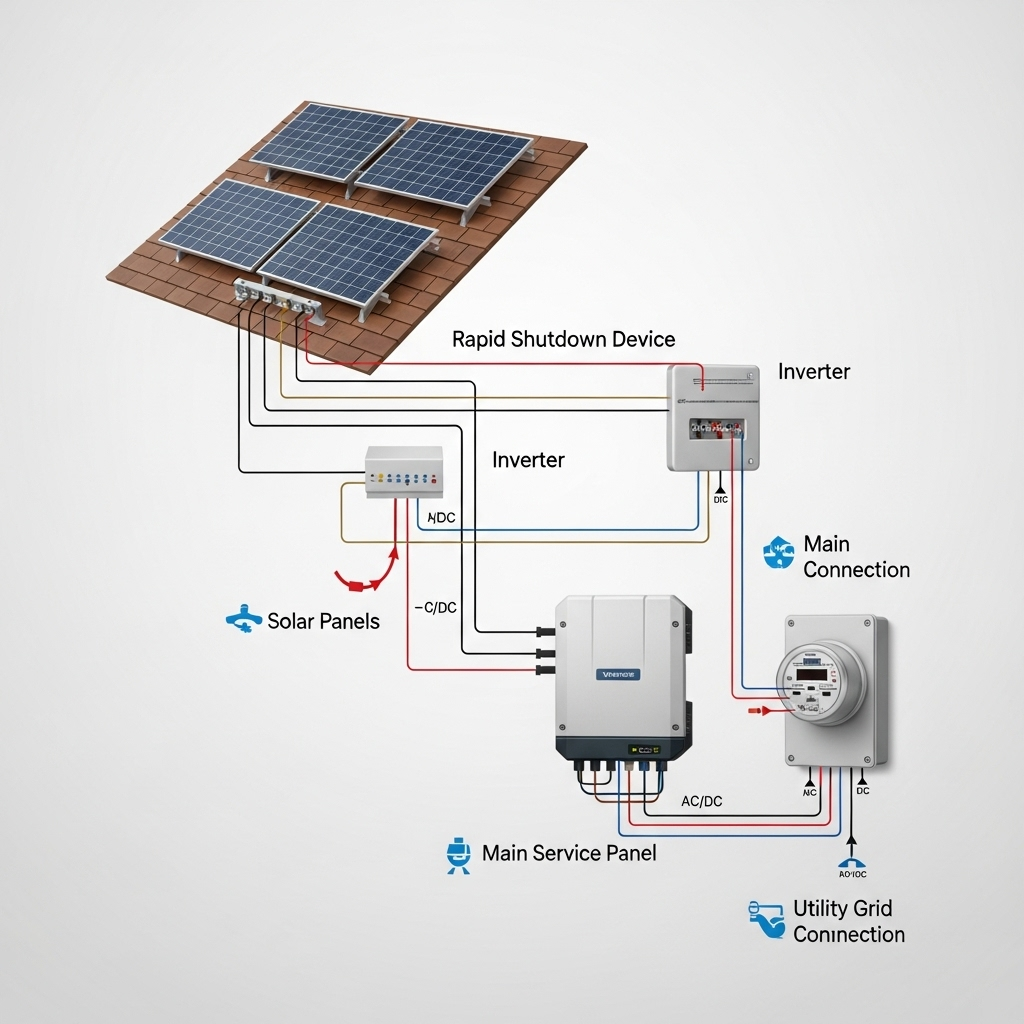
Mistake 3: Overlooking Layout and Wire Routing Efficiency
The physical arrangement of your solar components has a direct impact on the amount of wire needed and the labor required for installation.
The 'Long Run' Problem
Placing components far apart—for example, having the battery bank in the basement and the inverter in the garage—creates the need for long, heavy-gauge cable runs. These long runs not only increase material costs substantially but also contribute to higher voltage drop, reducing overall system efficiency. Just as public utility projects face challenges with transmission capacity, as detailed in the IEA's Empowering Variable Renewables report, your home system's 'transmission' lines must be efficient.
Strategic Component Placement
Design a compact layout by grouping major components like the inverter, charge controller, and batteries as close together as possible. This strategy minimizes the length of the most expensive cables. A well-planned layout not only reduces BOS expenses but also simplifies the installation process, cutting down on labor hours.
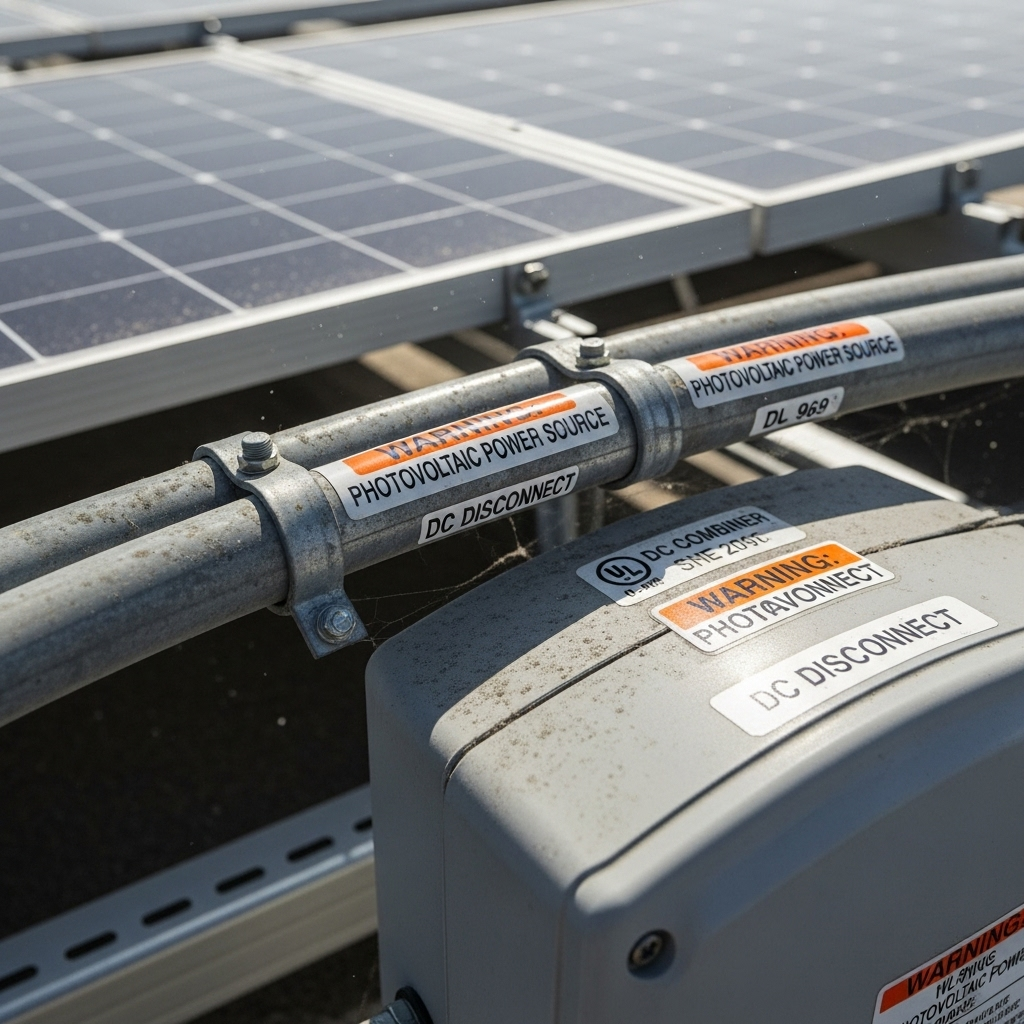
Mistake 4: Using Low-Quality Connectors and Terminals
Connectors, lugs, and terminals are the points where your system's components join. Skimping on these small parts can create big problems.
A Weak Link in the Chain
Low-quality connectors can result in poor electrical connections. A loose or corroded connection creates high resistance, which generates heat, wastes energy, and can even become a fire hazard. This power loss at connection points can degrade the performance of your entire system.
Invest in Quality for Reliability
Always use high-quality, properly rated connectors and terminals. Ensure every connection is clean, tight, and secure. Using the correct crimping tool for wire lugs is essential for creating a durable, low-resistance bond. This attention to detail prevents future troubleshooting and rework, saving you labor costs in the long run.
Mistake 5: Forgetting Proper Conduit and Cable Management
A messy installation is more than just an aesthetic issue; it's a sign of potential long-term problems and increased costs.
The Cost of Disorganization
Exposed and unmanaged wires are vulnerable to physical damage, UV degradation from sunlight, and moisture. This can lead to premature failure and costly repairs. Furthermore, a disorganized system is difficult to inspect, maintain, or upgrade. Any future work will take longer, increasing labor charges.
Best Practices for a Professional Finish
Protect all wiring runs with appropriate conduit. Use cable trays, clamps, and zip ties to organize and secure wires. Labeling your cables is another simple step that makes future maintenance much easier. A clean, well-managed installation is safer, more reliable, and more cost-effective over the life of the system.
Mistake 6: Underestimating the Labor for Customization
While sourcing individual components might seem like a way to save money, the labor required to integrate them can quickly erase those savings.
The Hidden Costs of DIY Integration
Building a system from separate parts requires significant time and expertise. You have to create custom busbars, drill enclosures for wiring, and ensure every component is compatible and configured correctly. This custom work is labor-intensive and can introduce points of failure if not done perfectly.
The All-in-One Advantage
Consider an integrated Energy Storage System (ESS). These systems combine the lithium battery, inverter, and charge controller into a single, pre-wired, and pre-configured unit. While the initial purchase price may be higher, an ESS can drastically reduce on-site wiring, configuration, and overall installation time. This approach simplifies the process and can lead to a lower total project cost by minimizing labor.
Mistake 7: Failing to Plan for Future Expansion
Your energy needs may grow over time. A system designed without scalability in mind can be expensive to upgrade later.
The 'Rip and Replace' Cost
If your initial system is operating at its maximum capacity, adding more panels or batteries later might require you to replace key BOS components like the inverter, charge controller, or even the main wiring. This 'rip and replace' scenario is inefficient and costly.
Future-Proofing Your BOS
When designing your system, think about your future needs. Select an inverter and charge controller that can handle a larger load than you currently require. Use a combiner box with extra circuits available. This foresight makes future expansion a simple and affordable process. To properly plan, it's helpful to understand key metrics. You can review a detailed breakdown of solar storage performance metrics to better forecast your future requirements.
Smart BOS Planning: Your Key to Cost Control
True cost optimization in a solar project goes beyond the price of panels. By making smart decisions about your Balance of System components, you can significantly reduce wiring and labor costs. Focusing on the right system voltage, proper wire sizing, efficient layout, quality components, and planning for the future will result in a safer, more reliable, and more affordable path to energy independence.
Frequently Asked Questions
What does BOS mean in a solar system?
BOS stands for Balance of System. It includes all the components of a photovoltaic system other than the solar panels themselves. This covers wiring, inverters, batteries, charge controllers, mounting hardware, connectors, and conduits.
How much does system voltage affect wiring cost?
System voltage has a major impact. A higher voltage system (e.g., 48V) requires less current to produce the same amount of power as a lower voltage system (e.g., 12V). This lower current allows for the use of thinner, and therefore less expensive, copper wires, which can lead to significant savings.
Is it worth paying more for an integrated ESS?
For many, yes. An integrated Energy Storage System (ESS) may have a higher upfront cost, but it can save a substantial amount on labor and additional wiring. Since the battery, inverter, and charge controller are pre-wired in one unit, it simplifies installation, reduces potential wiring errors, and shortens the time needed to get the system operational.
Leave a comment
All comments are moderated before being published.
This site is protected by hCaptcha and the hCaptcha Privacy Policy and Terms of Service apply.