Setting up a solar energy system requires precision. The connection between your hybrid charge controller and a 12V LiFePO4 battery is the heart of your system's efficiency and longevity. A proper wiring setup ensures you get reliable power, protect your investment, and operate safely. This guide provides a clear, step-by-step process for a successful installation.
Understanding the Core Components
Before you begin, it's important to recognize what each component does and why they are chosen for modern energy storage solutions. The controller and the battery work together to manage the flow of energy, from generation to storage and use.
The Role of the Hybrid Charge Controller
A hybrid charge controller is a sophisticated device that acts as the traffic director for your solar power system. It manages the power coming from your solar panels and can also integrate an AC power source, like the utility grid or a generator. This dual capability ensures your batteries are charged efficiently and your loads are powered consistently, even when solar energy is unavailable. Many advanced controllers use Maximum Power Point Tracking (MPPT) technology to extract the most power possible from the solar array, adjusting to changing light conditions throughout the day.
Why Choose a 12V LiFePO4 Battery?
Lithium Iron Phosphate (LiFePO4) batteries have become the standard for reliable energy storage. Their chemistry offers significant advantages over traditional lead-acid batteries. You benefit from a much longer lifespan, often exceeding 4,000 charge cycles, and the ability to safely discharge the battery more deeply without causing damage. They are also more efficient, meaning less energy is lost during charging and discharging. The inherent stability of LiFePO4 chemistry makes it one of the safest options available. For a comprehensive analysis of battery metrics, the ultimate reference on solar storage performance provides detailed data on what to expect from high-quality energy storage.
Pre-Wiring Preparations and Safety
Proper preparation and a focus on safety are non-negotiable. Gathering the right tools and understanding the risks involved will prevent costly mistakes and ensure a secure installation.
Essential Tools and Materials
Having the correct equipment on hand makes the process smoother and safer. Here is a list of what you will typically need:
- Correctly sized wires (consult a wire gauge chart based on amperage and distance)
- Wire strippers and crimpers
- A set of insulated screwdrivers
- A digital multimeter
- Fuses or circuit breakers appropriately rated for your system
- Safety glasses and insulated gloves
- Battery terminal connectors
Safety First: Critical Precautions
Working with electricity demands your full attention. Always prioritize safety by following these precautions:
- Ensure all power sources are completely disconnected before you start. This includes covering solar panels to stop power generation and shutting off any grid or generator connections.
- Wear appropriate personal protective equipment (PPE), including safety glasses and insulated gloves.
- Double-check all connections for correct polarity (positive to positive, negative to negative). Reversing polarity can permanently damage your equipment.
- Work in a well-ventilated area, especially when making final connections.
Disclaimer: This guide is for informational purposes only and is not a substitute for professional advice. Electrical work can be dangerous. Always adhere to local electrical codes and consider consulting a qualified electrician for your installation. This content does not constitute legal or financial advice.
The Step-by-Step Wiring Process
Connecting your components in the correct order is critical for the system to initialize properly and operate safely.
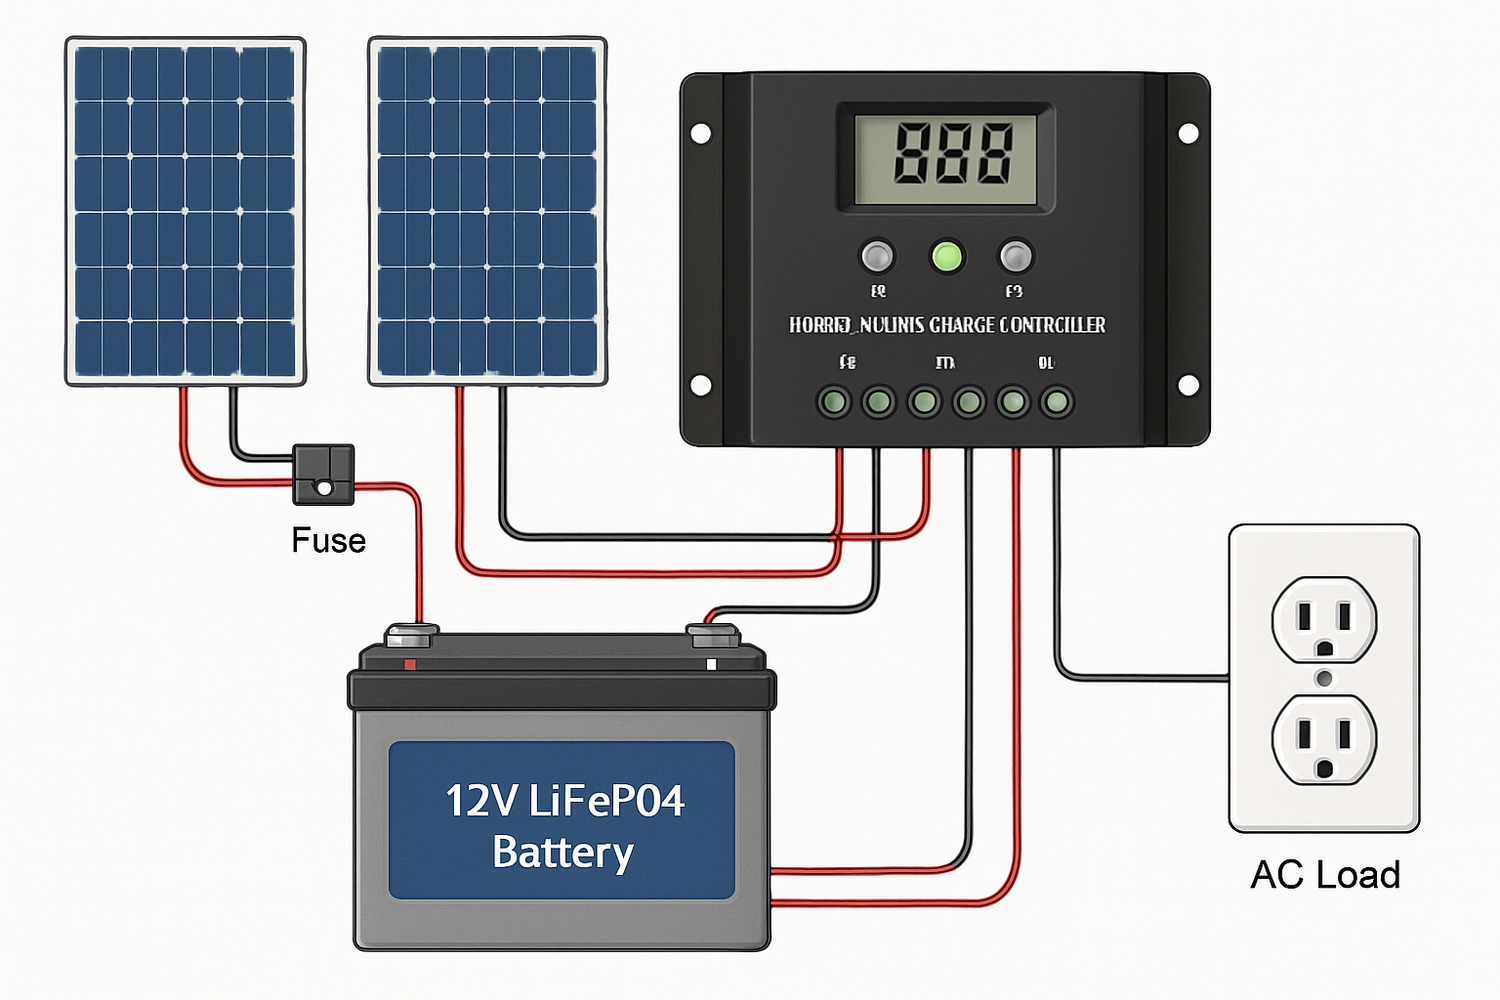
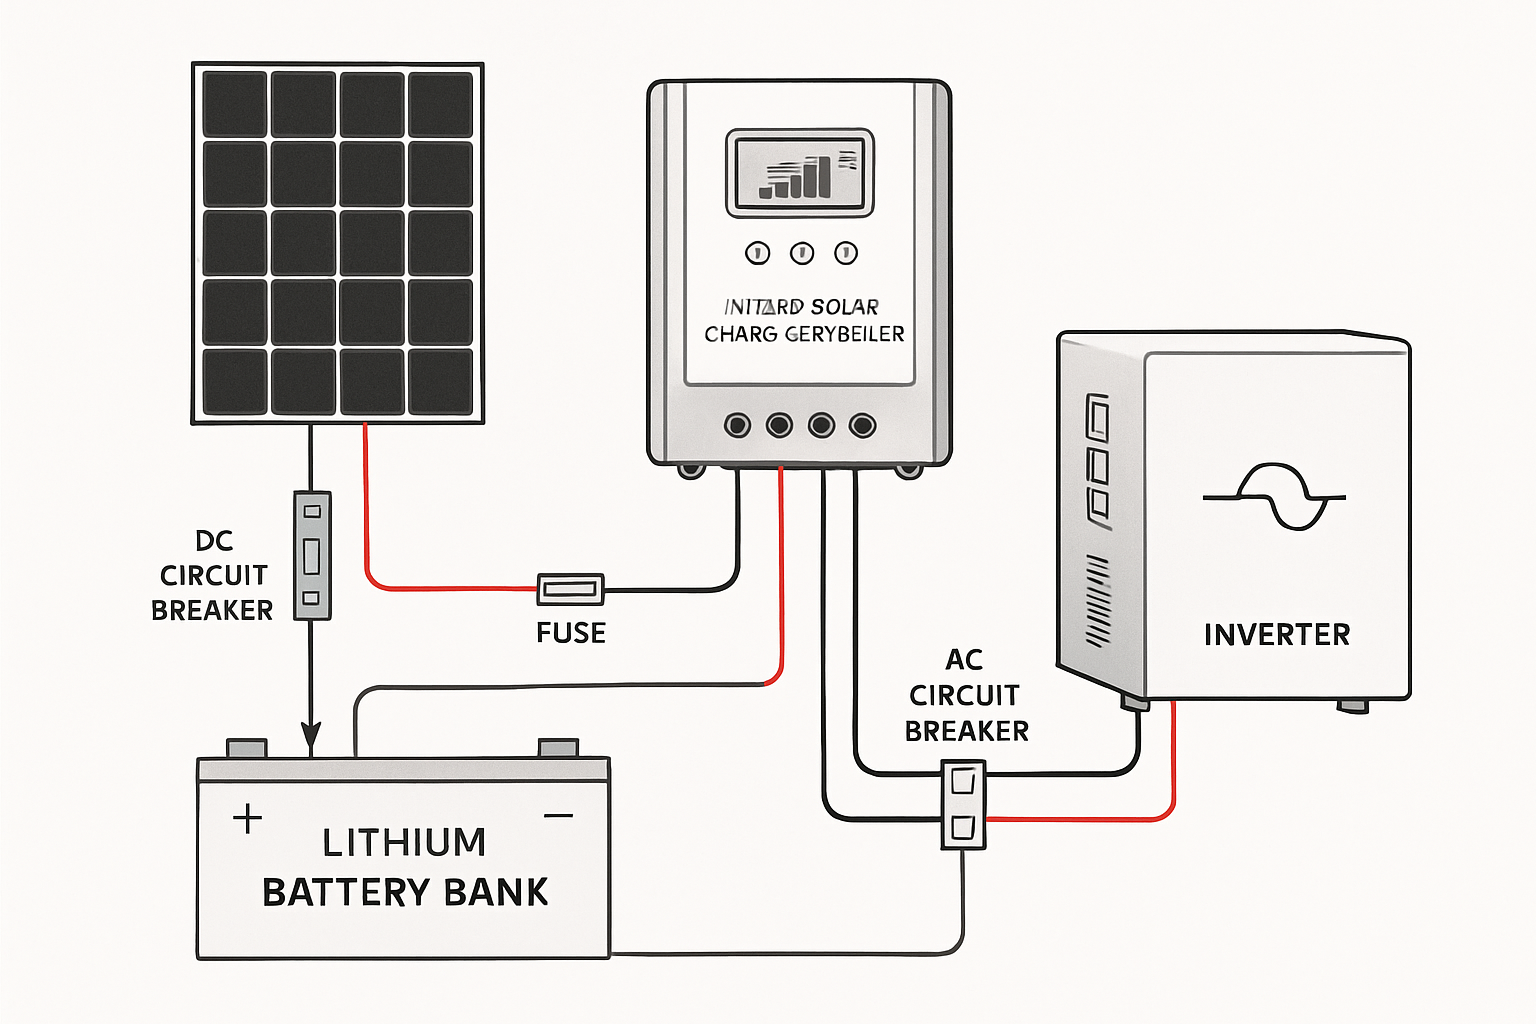
Step 1: Connecting the LiFePO4 Battery to the Controller
Always connect the battery to the charge controller first. This allows the controller to detect the system voltage (12V in this case) and configure itself accordingly.
- Identify the battery terminals on your charge controller. They are usually marked with a battery icon and +/- symbols.
- Connect the negative (-) wire from the battery's negative terminal to the controller's negative battery terminal.
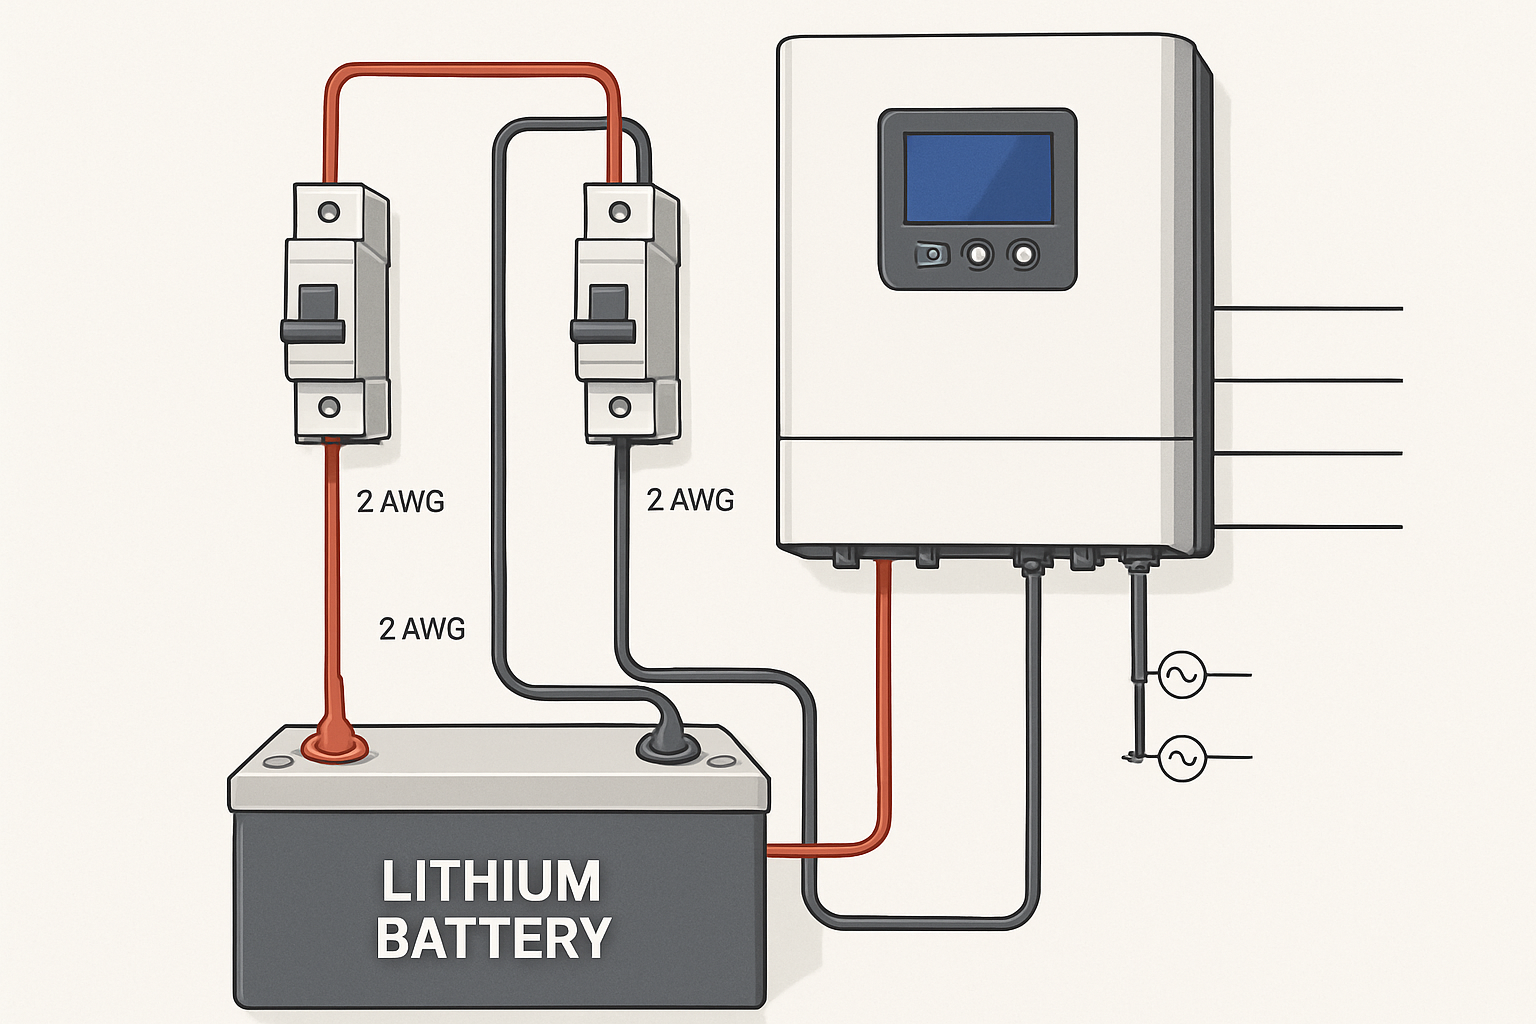
- Install an in-line fuse or circuit breaker on the positive wire, as close to the battery as possible. This is a critical safety feature.
- Connect the positive (+) wire from the battery's positive terminal, through the fuse/breaker, to the controller's positive battery terminal.
- Once connected, the controller should power on.
Step 2: Connecting the Solar Panels (PV Array)
With the controller powered on by the battery, you can now connect your solar panels.
- Before connecting, use your multimeter to check the voltage and polarity of the wires coming from your solar array.
- Connect the positive wire from the solar panels to the PV+ terminal on the controller.
- Connect the negative wire from the solar panels to the PV- terminal on the controller.
- The controller's display should now indicate that it is receiving power from the panels and beginning the charging process.
Step 3: Connecting AC Input and Output
The 'hybrid' functionality involves AC power. This part of the installation often requires more advanced electrical knowledge. Connect the grid or a generator to the AC input terminals as specified by the manufacturer. This allows the controller to charge the battery from an AC source when solar is insufficient. The AC output terminals are used to power your appliances. These connections must be made carefully, following the controller's manual and local electrical codes.
Configuring the Hybrid Controller for LiFePO4
Wiring is only half the battle. You must configure the controller's settings to match the specific needs of your LiFePO4 battery to ensure its health and longevity.
Setting the Correct Charging Parameters
LiFePO4 batteries require different voltage settings than lead-acid batteries. Using a preset 'Sealed Lead-Acid' or 'Flooded' profile can lead to overcharging and damage. You must manually set the charging parameters in your controller's user settings menu.
| Parameter | Recommended Voltage (for 12V LiFePO4) | Description |
|---|---|---|
| Bulk/Boost Voltage | 14.2V - 14.6V | The initial, high-current charging stage. |
| Absorption Voltage | 14.2V - 14.6V | The voltage is held constant as current decreases. |
| Float Voltage | 13.5V - 13.8V | A lower voltage to keep the battery topped off once fully charged. |
| Equalization | Disabled (0V) | This feature is for lead-acid batteries and is harmful to LiFePO4. |
Always consult your battery manufacturer's datasheet for the precise recommended settings.
Monitoring and System Verification
After completing the wiring and configuration, perform a final check. Use the controller's display or a connected monitoring app to verify that all readings are normal. Check the battery voltage, incoming solar current, and any AC load. Ensure all physical connections are tight and secure. Proper monitoring is part of a larger trend in energy management. As noted by the International Renewable Energy Agency (IRENA), the ability to control energy assets is crucial. The Grid Codes for Renewable Powered Systems report highlights that energy storage should be controllable in its injection and absorption of electricity, a principle that starts with a correctly configured home system.
Optimizing Your Energy System
A successful installation is the foundation for energy independence. By correctly wiring and configuring your hybrid controller and LiFePO4 battery, you have built a robust and efficient power system. Ensure your components have adequate ventilation to prevent overheating, which can impact performance and lifespan. This setup not only provides reliable power but also gives you control over your energy resources. The principles of smart energy management, such as those discussed in IRENA's Innovation Outlook on smart charging, are directly applicable. Just as smart charging adapts to grid conditions, your hybrid system adapts to your home's needs and available solar power, maximizing self-consumption and resilience.
Frequently Asked Questions
What wire gauge should I use for connecting the battery?
The correct wire gauge depends on the maximum current your system will handle and the length of the wire. A thicker wire (lower gauge number) has less voltage drop. For a connection between a 100Ah battery and a controller, a 4 AWG or 6 AWG wire is often sufficient for short distances, but you should always consult a wire gauge sizing chart and your controller's manual for a precise recommendation.
Can I connect the solar panels before the battery?
No, this is not recommended. The charge controller needs to reference the battery's voltage to initialize its systems and charging parameters correctly. Connecting the solar panels first can send unregulated, high-voltage power into the controller, potentially damaging it.
Do I need a fuse between the controller and the battery?
Yes, this is a critical safety requirement. A fuse or circuit breaker on the positive line between the battery and the controller protects against overcurrent and short circuits. This prevents damage to your equipment and significantly reduces the risk of a fire.
What happens if I use the wrong charging settings for my LiFePO4 battery?
Using incorrect charging settings can severely impact your battery's health and lifespan. Overcharging, even at a slightly too high voltage, can cause irreversible damage to the battery cells. Undercharging will prevent you from using the battery's full capacity. Always use the specific parameters recommended by the battery manufacturer.


Leave a comment
All comments are moderated before being published.
This site is protected by hCaptcha and the hCaptcha Privacy Policy and Terms of Service apply.