
The foundation of any high-performing rooftop solar energy system is, quite literally, the roof itself. Your roof type dictates the specific mounting systems, techniques, and considerations required for a safe, secure, and efficient solar panel installation. While most modern roofs can host a solar array, the approach for asphalt shingle, tile, and metal surfaces varies significantly.
Understanding these differences is key to protecting your investment and ensuring your system produces optimal power for decades. This guide provides a detailed look at the racking solutions and best practices for the three most common residential roofing materials, helping you build a solid base for your energy independence.
Asphalt Shingle Roofs: The Common Ground for Solar
Asphalt shingle is the most prevalent roofing material in North America, making it the most common surface for solar panel installations. Its widespread use means installers are very familiar with the process, which is generally straightforward and cost-effective.
Understanding Shingle Roofs and Their Composition
Typically made from a fiberglass or organic base mat coated in asphalt and topped with mineral granules, asphalt shingles are affordable and relatively durable. However, their lifespan of 15-30 years is often shorter than the 25+ year lifespan of solar panels. This makes the roof's age and condition a primary factor; installing a new solar array on an old roof is not a sound investment. A pre-installation inspection is critical.
Mounting Systems and Racking for Shingle Roofs
The standard solar panel installation method for shingle roofs involves securing mounts directly to the roof's structural rafters. This process includes:
- Locating the rafters beneath the sheathing.
- Drilling pilot holes through the shingles and into the rafters.
- Installing lag bolts or structural screws to anchor the mounting feet (often L-feet).
- Sliding a piece of flashing under the shingle above the penetration and integrating it with the mount to create a waterproof seal.
Properly sealing every penetration is non-negotiable to prevent leaks. High-quality sealants and correctly installed flashing are essential for long-term protection. For more on this, see our detailed article: How to seal asphalt-shingle penetrations: flashings that last.
Key Considerations and Potential Issues
While straightforward, shingle roof installations demand precision. The primary risk is water intrusion from improperly sealed penetrations. Using code-compliant hardware and proven waterproofing techniques is the best way to avoid issues. You can learn more about this in our guide on Stop callbacks: code-compliant mounts for every roof type. Ensuring every mount is anchored securely into the center of a rafter is also vital for the structural integrity of the system.
Tile Roofs: Navigating Elegance and Complexity
Tile roofs, made from clay, concrete, or slate, are known for their exceptional durability and aesthetic appeal. However, they also present the most complex challenges for solar panel installation due to the fragile nature of the tiles themselves.
The Anatomy of Clay, Concrete, and Slate Tile Roofs
Tiles come in various profiles, such as flat, S-profile, or W-profile. Their primary function is to shed water, but they are not designed to bear concentrated weight and can easily crack or break if handled improperly. This fragility is the main reason why a specialized approach is necessary for a successful solar panel installation.
Specialized Mounting Techniques for Tile
Directly mounting on top of tiles is not an option. Instead, installers must use specialized hardware that transfers the load of the solar array directly to the roof's structural members. The two primary methods are:
- Tile Hooks: This is the most common method. A tile is carefully removed, and a strong, corrosion-resistant hook is bolted directly to the rafter. The tile is then replaced, often requiring it to be notched or ground down to fit snugly over the hook without pressure.
- Tile Replacements: These are mounts shaped like a tile with an integrated flashing and mounting post. The installer removes a tile and replaces it with this all-in-one unit, which is secured to the roof deck and sealed.
Both methods are labor-intensive and require a high degree of skill. To understand the common pitfalls, it is helpful to review the 7 mounting mistakes on tile roofs and how to avoid leaks.
Best Practices for a Leak-Proof Installation
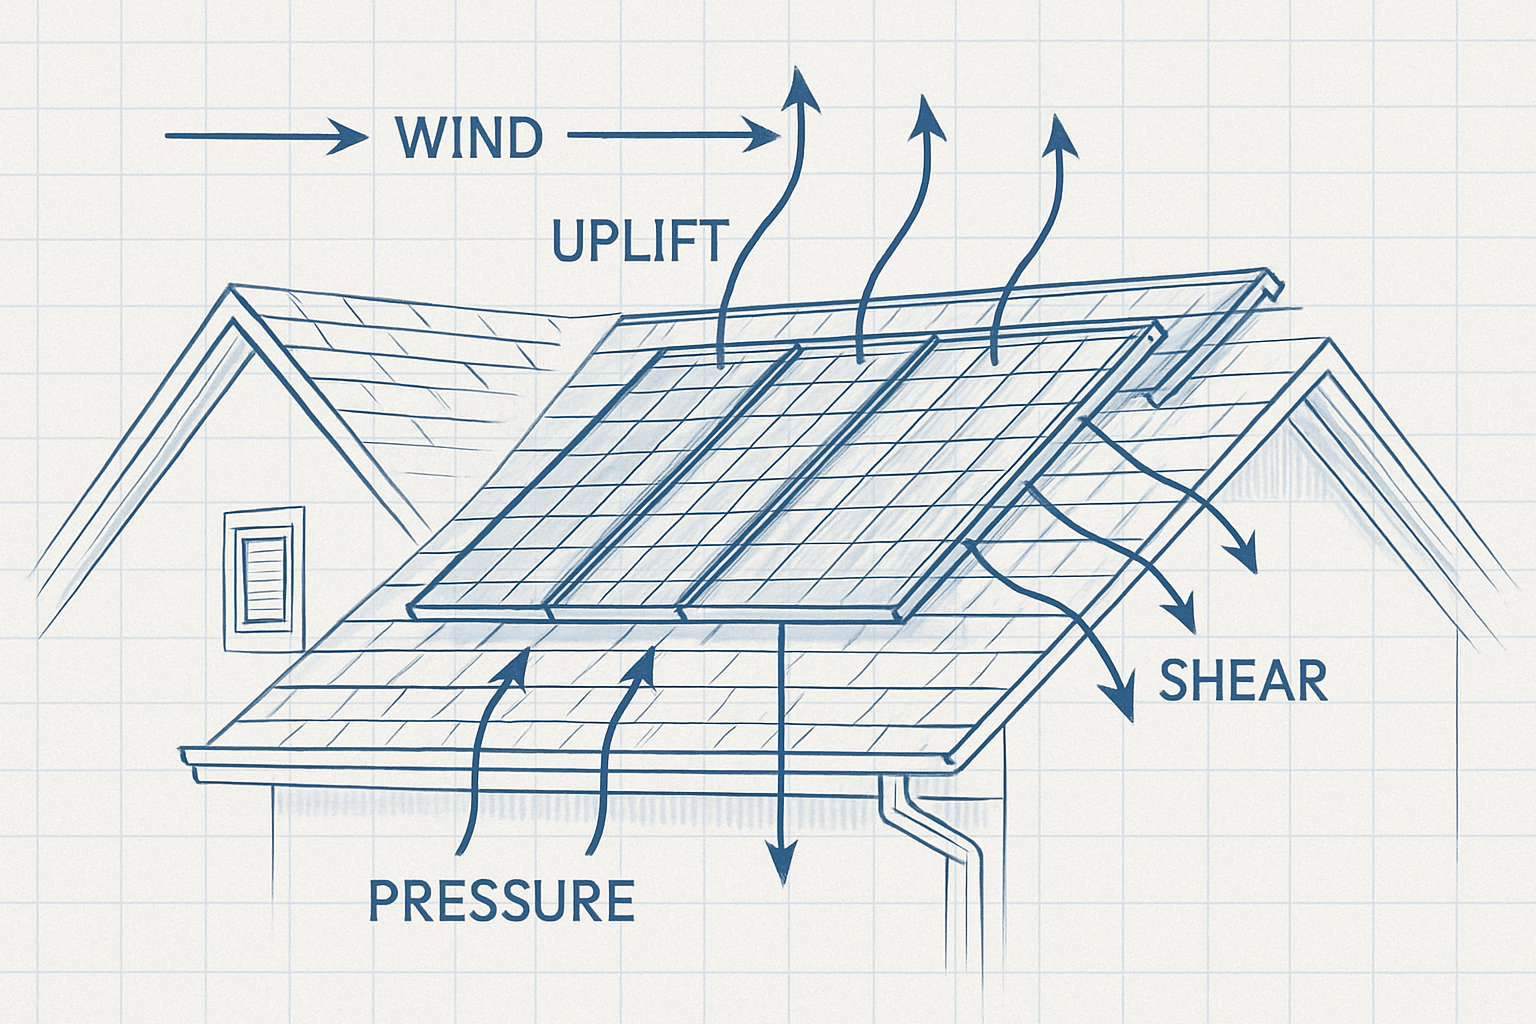
A successful tile roof installation hinges on meticulous workmanship. Installers should always have spare tiles on hand, as some breakage is almost inevitable. Ensuring that the underlayment—the waterproof barrier beneath the tiles—is not compromised is also critical. Furthermore, these heavy roofs, combined with solar panels, must be assessed for wind and snow loads, a topic covered in Designing mounts for wind uplift and snow on tile, metal.
Metal Roofs: The Durable and Versatile Solar Platform
Metal roofs are an excellent platform for solar panels, largely due to their incredible durability and lifespan, which often exceeds that of the solar system itself. The installation method, however, depends entirely on the type of metal roof.
Types of Metal Roofing: Standing Seam vs. Corrugated
There are two main categories of metal roofing:
- Standing Seam: Characterized by raised vertical seams that interlock between panels. This design is highly advantageous for solar installations.
- Corrugated or R-Panel: These roofs have exposed fasteners and a wavy or ribbed profile. They require a different mounting approach than standing seam roofs.
Racking Solutions for Metal Roofs
The approach to solar panel installation on metal roofs is distinct for each type:
- For Standing Seam Roofs: The premier advantage is the ability to use non-penetrating clamps. These specialized aluminum clamps attach directly to the raised seams, securing the racking system without drilling a single hole into the roof surface. This method is fast, secure, and completely eliminates the risk of leaks associated with penetrations. The benefits are further explored in Standing-seam clamps vs penetrations: safer metal roof PV?.
- For Corrugated Roofs: These roofs require penetrations. Installers use hanger bolts or specialized brackets that are drilled through the high points of the corrugations directly into the rafters or purlins below. These penetrations are sealed using EPDM rubber gaskets or washers to create a durable, watertight seal. A variety of anchor options are discussed in Q&A: which anchors fit shingle, tile, and corrugated metal?.
Advantages and Specific Challenges
The primary advantage of metal roofs is longevity. For standing seam roofs, the non-penetrating mounting method is a significant benefit. A key challenge for all metal roof installations is ensuring proper electrical grounding of the entire system, as the metal roof itself can become part of the electrical path if not correctly managed.
A Comparative Look: Which Roof is Best for Your Solar System?
Each roof type has its own set of pros and cons for a solar panel installation. The best choice depends on factors like budget, roof longevity, and installation complexity. For a comprehensive overview, refer to the Ultimate guide to mounting on shingle, tile, and metal roofs.
| Feature | Asphalt Shingle | Tile | Metal (Standing Seam) |
|---|---|---|---|
| Installation Cost | Lowest | Highest | Moderate |
| Installation Speed | Fast | Slowest | Fastest |
| Risk of Leaks (if done poorly) | Moderate | High | Lowest |
| Required Hardware | L-feet, Flashing, Lag Bolts | Tile Hooks or Replacements | Non-Penetrating Seam Clamps |
| Roof Lifespan Compatibility | Good (if roof is new) | Excellent | Excellent |
Integrating Your Roof-Mounted System with Energy Storage
A properly installed solar array is the first step toward energy independence. The next is effectively storing and managing the energy you produce. This is where a complete, integrated solution becomes essential.
From Rooftop to Battery: A Complete Energy Solution
At ANERN, we focus on providing reliable and scalable energy solutions. A complete residential solar system pairs your rooftop panels with a high-performance energy storage system. Our all-in-one residential ESS solutions integrate a hybrid inverter, a charge controller, and the battery into a single unit, simplifying installation and ensuring all components work together seamlessly.
How Roof Choice Impacts System Performance and Storage Needs
A secure, professional solar panel installation, regardless of roof type, maximizes the energy harvest from your panels. This optimal production directly affects your energy storage strategy. Higher energy generation means your batteries charge faster and you have more stored power available for nighttime use or during a grid outage. Understanding the performance metrics of your entire system is crucial. For a deep dive into these metrics, our Ultimate Reference on Solar & Storage Performance provides detailed data and explanations.
The core of our storage solutions is advanced Lithium Iron Phosphate (LiFePO4) battery technology. ANERN's lithium batteries are known for their long lifespan, high efficiency, and superior safety, making them an ideal match for a high-performing rooftop solar array. This stable chemistry reduces risks and ensures reliable power for years.
Achieving Energy Independence
Combining a correctly installed rooftop solar array with a robust ANERN energy storage system empowers you to take control of your energy. This combination provides a stable power supply, reduces reliance on the utility grid, and offers peace of mind. It is the foundation for true energy independence, suitable for everything from suburban homes to remote off-grid solar applications on farms or cabins.
Final Thoughts: Building a Foundation for Energy Independence
While asphalt shingle, tile, and metal roofs each present unique requirements for solar panel installation, all are perfectly viable with the right expertise, hardware, and techniques. The key takeaway is that a high-quality installation is fundamental to the safety, longevity, and performance of your entire solar energy system. By understanding the nuances of your specific roof, you ensure that your journey toward energy independence is built on a solid, reliable foundation.
Disclaimer: This article is for informational purposes only. It is not intended to be a substitute for professional engineering, electrical, or legal advice. Always consult with qualified professionals and adhere to local building codes and regulations for any solar installation project.

Leave a comment
All comments are moderated before being published.
This site is protected by hCaptcha and the hCaptcha Privacy Policy and Terms of Service apply.