


RV owners come to your shop looking for longer boondocking time, fewer battery failures, and a power system that feels modern instead of fragile. Many of their rigs still rely on heavy lead-acid banks that sag under load and age quickly. A well-planned upgrade to a 12V LiFePO4 battery lets you offer a cleaner solution and gives your team a repeatable process they can trust from project to project.
Step 1: Clarify Your RV Lithium Battery Upgrade Goals And System Requirements
Every RV lithium battery upgrade runs smoother when the scope is clear. Before anyone picks up a wrench, lock down what the vehicle must do in real use.
- Off-grid expectations: How many days the RV should stay away from hookups without running a generator.
- Critical loads: Which devices must stay live in that window: air conditioner, fridge, furnace fan, laptops, routers, cooking gear, and so on.
- Charging opportunities: How often the owner typically drives, plugs into shore power, and parks in full sun.
Turn those answers into numbers: daily energy budget in watt-hours, reserve days, peak inverter power, and acceptable recharge times. At the same time, map the existing system: alternator rating, converter or charger size, solar wattage, controller type, and any DC-DC charger that is already installed. A 12V LiFePO4 battery will sit inside that ecosystem, so you need a solid picture of the whole layout.
Step 2: Size 12V Lithium Batteries for Different RV Layouts and Use Cases
Correct sizing is the foundation of a reliable package. 12V lithium batteries can handle deep discharge, so usable capacity is very different from a similar amp-hour rating on a lead-acid bank. A simple calculation model keeps planning consistent across floor plans.
- List each DC or AC load that draws from the house bank.
- Note its power draw in watts and typical hours of use per day.
- For each device, calculate daily energy use: Device daily Wh = Watts × Hours
- Add all device values to get the daily total: Daily total Wh = sum of all device daily Wh
- Multiply by the desired number of reserve days.
- Convert watt-hours to amp-hours at 12 volts: Required Ah = Total Wh / 12
For a 12V LiFePO4 battery, most of the rated amp-hours can safely be used under normal conditions. A similar lead-acid bank often stays near half of its label to protect cycle life. That difference allows you to design a smaller nominal capacity while still hitting the same runtime targets.
For compact trailers and camper vans, a single 12V 100Ah lithium battery for RV use often keeps lights, fans, pumps, and a midsize inverter happy. Larger motorhomes with heavy HVAC and cooking loads may need several 12V lithium batteries in parallel. Building a simple ladder of standard banks, such as 100Ah, 200Ah, and 300Ah, lets you match each RV layout to a known package and quote quickly.
Step 3: Inspect Existing Wiring and Safety Before the 12V LiFePO4 Battery Installation
A clean inspection prevents surprises during installation and after delivery. Before any 12V LiFePO4 battery installation work, isolate every power source in the coach.
- Unplug shore power at the pedestal.
- Shut down the generator and let it stop fully.
- Open DC breakers and main disconnect switches feeding the house bank.
- Disconnect or cover solar inputs at the combiner box or controller.
- Confirm with a meter that the main battery cables sit at zero volts.
Once the system is safe and quiet, review the infrastructure that will support the new bank.
- Cables: Check length and gauge against expected charge and discharge currents. Look for brittle insulation, corrosion, and loose or mismatched lugs.
- Fuses and breakers: Make sure main positive conductors have correctly sized overcurrent protection located close to the battery connection. Replace unknown or damaged devices.
- Battery compartment: Inspect mounting surfaces, tie-down points, moisture exposure, and service access. A 12-volt LiFePO4 battery does not need venting for gas, yet it still needs secure mounting and basic environmental protection.
- Grounding and bonding: Verify that the negative bus and chassis bonds are solid and that solar and DC systems share a clear grounding plan.
Record what you find on an internal inspection sheet. Over time, that sheet becomes part of your 12V LiFePO4 battery installation guide and helps new technicians follow the same routine as your senior staff.
Step 4: Remove the Lead-Acid Bank and Mount the New 12 Volt LiFePO4 Battery
Removing the Old Lead-Acid Bank
Physical removal sets the tone for the whole job. Follow the same order each time so training stays simple.
- Disconnect the negative cable first.
- Disconnect the positive cable second.
- Tag wires or take photos if the compartment is crowded.
- Move heavy, flooded, or AGM units with proper lifting aids.
- Send old batteries to an approved recycling channel as soon as possible.
These habits cut risk in the bay and keep the workspace under control.
Mounting the New 12V LiFePO4 Battery
Installation of the new bank calls for attention to restraint and short-circuit protection.
Use trays, brackets, or straps rated for the weight of the 12V LiFePO4 battery and for the shock loads of hard braking and rough roads. Add non-slip or vibration-damping pads when surfaces are smooth. If you install several 12V lithium batteries in parallel, aim for equal cable lengths from each unit to the main positive and negative connection points. That simple detail helps balance the current between packs.
Mount the main fuse or breaker close to the positive terminal to minimize unprotected cable length. Torque lugs to the values in the hardware sheet. After tightening, perform a firm pull test on each cable. Extra care at this stage prevents intermittent faults that are hard to diagnose later.
Step 5: Upgrade Chargers, Controllers, and Protection for 12V LiFePO4 Battery Systems
Charging and protection define the long-term health of the system. Many older RV converters and chargers follow voltage curves designed for lead-acid batteries. If left unchanged, those devices can leave a 12V LiFePO4 battery undercharged most of the time or floating at a voltage that does not match its chemistry.
Work through each charging path in turn.
Shore power chargers and inverter-chargers: Choose units with a lithium profile or configurable stages. Set bulk and absorption voltages according to the battery data sheet. Adjust absorption time and float settings to match LiFePO4 recommendations instead of default lead-acid values.
Engine and DC-DC charging: Where the alternator feeds the house bank, add a DC-DC charger. This limits the current drawn from the alternator, protects engine components, and applies the correct charging limits to 12V lithium batteries in the coach.
Solar charge controllers: Configure MPPT or PWM controllers for 12V LiFePO4 battery systems. If no preset exists, enter absorption and float voltages manually from the specification. Reduce or disable aggressive temperature compensation used for lead-acid, so voltage does not drift outside the ideal range.
Then review protection. Respec fuses and breakers for the new maximum continuous current. Add clear disconnect points for inverters, DC distribution panels, and solar circuits. Those switches give technicians safe isolation points for future service without pulling cables from the battery itself.
Step 6: Commission and Monitor the 12V 100Ah Lithium Battery for RV Operation
Commissioning confirms that the upgraded bank behaves as planned. Once all wiring is in place and charging sources are configured, bring the system online in small steps. Close DC breakers, connect solar, then connect shore power, watching voltage and current on a meter or monitor. Any unexpected surge, drop, or alarm deserves attention before the rig leaves the bay.
Build a simple test routine for every RV:
- Charge the bank fully and log the final absorption voltage and current taper.
- Run common DC loads for a period and check key lugs and breakers for heat.
- Test large AC loads the owner will actually use, such as the microwave and air conditioner.
- Note the resting voltage at full and at a typical partial state of charge for future comparison.
Most modern packs include an internal BMS, and many support shunt-based monitors or mobile apps. Configure at least one of these so the owner or fleet manager can see the state of charge, charge and discharge current, and fault history. When the same 12V 100Ah lithium battery for RV projects appears again, your team can compare values against past jobs and catch issues early.
Practical Tips and Common Mistakes in 12V LiFePO4 Battery Installation for RVs
Small habits make a big difference across many installs. Teams that handle a lot of 12V LiFePO4 battery work often find the same patterns over time.
Helpful practices include:
- Maintain standard wiring diagrams for each floor plan and update them when designs change.
- Label major cables, fuses, and breakers so any technician can understand the layout quickly during an emergency visit.
- Reserve physical space for future expansion of the lithium bank and for larger inverters or extra solar hardware.
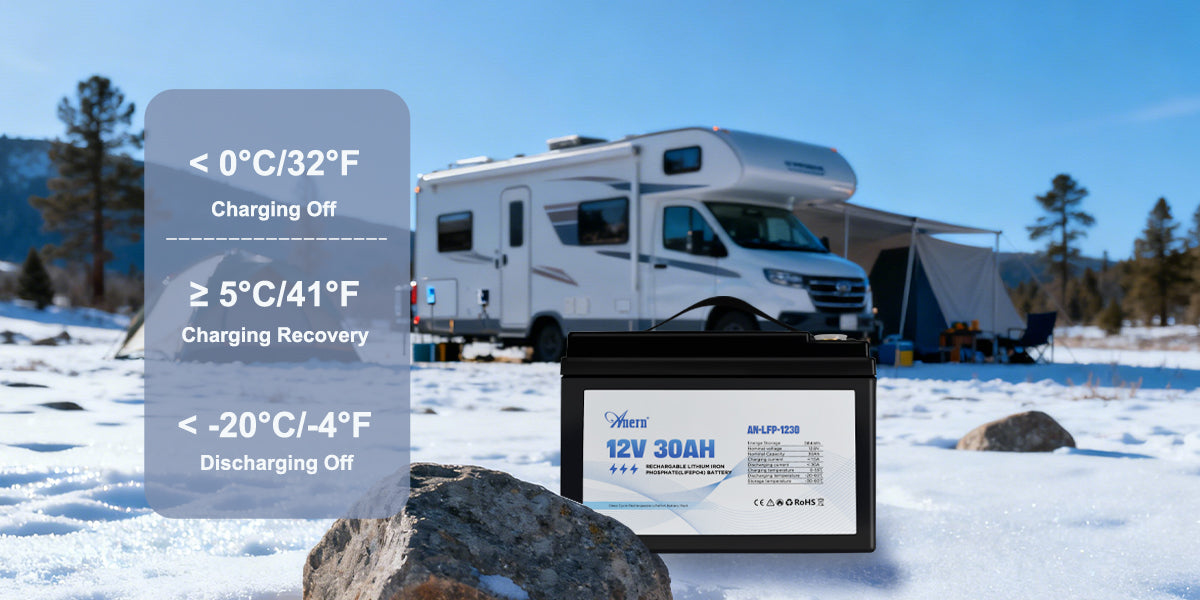
- Hand over a one-page usage note that explains storage voltage, seasonal charging habits, and cold-weather charging limits.
Frequent mistakes show up again and again:
- Reusing a cable gauge that is too small for the higher continuous current a 12V LiFePO4 battery can deliver.
- Leaving legacy chargers in place without checking or changing their voltage profile.
- Allowing charge current into a pack that is below the minimum recommended temperature.
- Mounting batteries with light strapping so cases can move and rub during travel.
- Skipping documentation of serial numbers, configuration settings, and test results.
Treat these points as standard procedure. They protect your margins, reduce callbacks, and keep your team focused on new revenue instead of rework.
Standardize Your RV Projects with 12V LiFePO4 Upgrades
As sizing rules, wiring details, charge settings, and test steps settle into a pattern, each 12V LiFePO4 battery installation becomes another instance of a proven design instead of a custom experiment. Training new techs gets easier, estimates stay accurate, and owners see consistent performance across different RV models. Over time, your shop can present a clear RV lithium battery upgrade package that delivers reliable runtime and fewer failures, giving customers confidence in your work and giving your bays room to focus on the next project in line.
FAQs
Q1. How long does a 12V LiFePO4 battery usually last in an RV?
In normal RV use, a quality 12V LiFePO4 battery often delivers 3,000–6,000 full cycles before dropping to around 70–80% of original capacity. In calendar terms, that usually means 8–15 years, depending on depth of discharge, temperature, and charge settings.
Q2. What certifications should a 12V LiFePO4 battery have for RV projects?
For RV work, look for UN38.3 transport certification, IEC or UL standards for stationary energy storage such as UL 1973, and documented short-circuit and overcharge tests. These give you a paper trail that supports insurance, RVIA inspections, and internal safety audits.
Q3. Can a 12V LiFePO4 bank reliably support an RV air conditioner?
Yes, as long as the bank and inverter are sized for the load. A typical rooftop unit draws roughly 1,200–1,700 watts running, with a higher startup surge. Design for continuous current, surge rating, and realistic run time, not nameplate capacity alone.
Q4. What ongoing maintenance does a LiFePO4 RV bank require?
Maintenance is light but not zero. Check terminal torque and visual condition annually, keep compartments dry and clean, review event logs from the BMS, and verify that firmware and monitoring apps are current. These quick checks help catch problems before trips.
Q5. How should a 12V LiFePO4 battery be stored in an RV during off-season?
For long storage, charge to about 40–60% state of charge, disconnect all parasitic loads, and park the RV in a cool, dry place. Avoid leaving the bank fully charged or completely empty for months, and verify voltage a few times per year.
