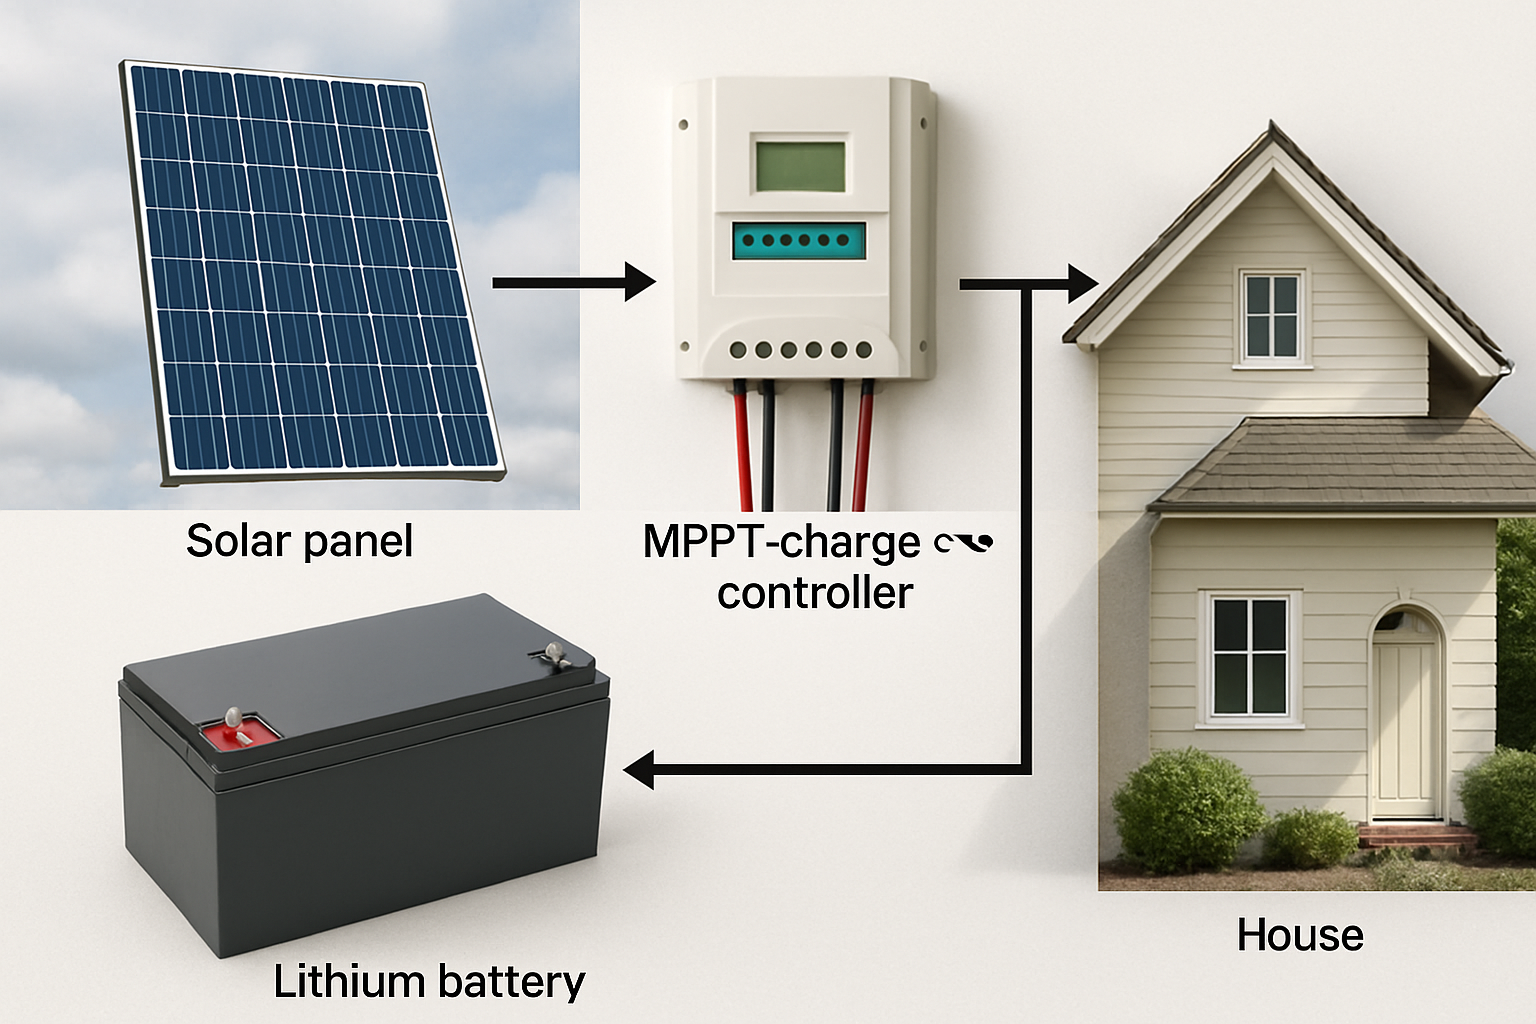
The hybrid charge controller is the operational core of a modern solar energy system. It intelligently manages power flow from your solar panels, the utility grid, and your battery bank, ensuring efficiency and reliability. A proper hybrid power controller installation is not just about connecting wires; it's about building a safe, robust foundation for your energy independence. This guide provides a detailed, step-by-step process based on years of hands-on experience in the solar and energy storage industry.
Pre-Installation Essentials: Tools, Safety, and System Planning
Before a single wire is connected, proper preparation is essential. Rushing this stage is a common mistake that can lead to performance issues or safety hazards down the road. Taking the time to plan your layout, gather the right materials, and review safety protocols will make the entire process smoother and more successful.
A. Gathering Your Tools and Components
Having the right tools for the job prevents frustration and ensures secure, professional-grade connections. You don't need a massive workshop, but a few key items are non-negotiable:
- Wire Strippers and Crimpers: For clean wire preparation and secure lug connections.
- Multimeter: Absolutely critical for verifying voltage and polarity before making connections.
- Screwdriver Set and Wrenches: For tightening terminals and mounting hardware.
- High-Quality Components: Your system is only as strong as its weakest link. This includes correctly gauged copper wiring, appropriate fuses or circuit breakers, and a reliable battery bank. High-performance LiFePO4 (Lithium Iron Phosphate) batteries are an excellent choice for their long cycle life and safety profile, forming the backbone of a durable off-grid solar solution.
B. Safety First: The Golden Rules of Electrical Wiring
Working with electricity demands respect. Even a 12V system can produce dangerous currents. I always follow these rules without exception:
- De-energize Everything: Ensure solar panels are covered or disconnected, the grid connection is off, and the battery is disconnected before you begin.
- Wear Personal Protective Equipment (PPE): Safety glasses and insulated gloves are a minimum.
- Check Local Codes: Electrical codes vary by location. Always check local regulations for requirements on fusing, grounding, and installation practices. For a solid foundation, review A Safety-First Checklist for Wiring Lithium Battery Storage.
Disclaimer: This guide is for informational purposes only and does not constitute professional electrical advice. Installation should be performed by a qualified professional and in accordance with all local electrical codes and regulations.
C. Understanding Your System's Voltage and Amperage
Your hybrid charge controller must be correctly sized for your solar array and battery bank. Mismatching components can lead to inefficiency or equipment damage. Before you start, confirm your system's nominal voltage (e.g., 12V, 24V, or 48V) and calculate the maximum current from your solar panels (Imp). This information determines the required wire gauge to prevent overheating and voltage drop. For larger systems, understanding these calculations is key. You can find more details in the Pro Tips for Wiring a 48V LiFePO4 Battery & Controller.
The Core Wiring Sequence: A Step-by-Step Connection Guide
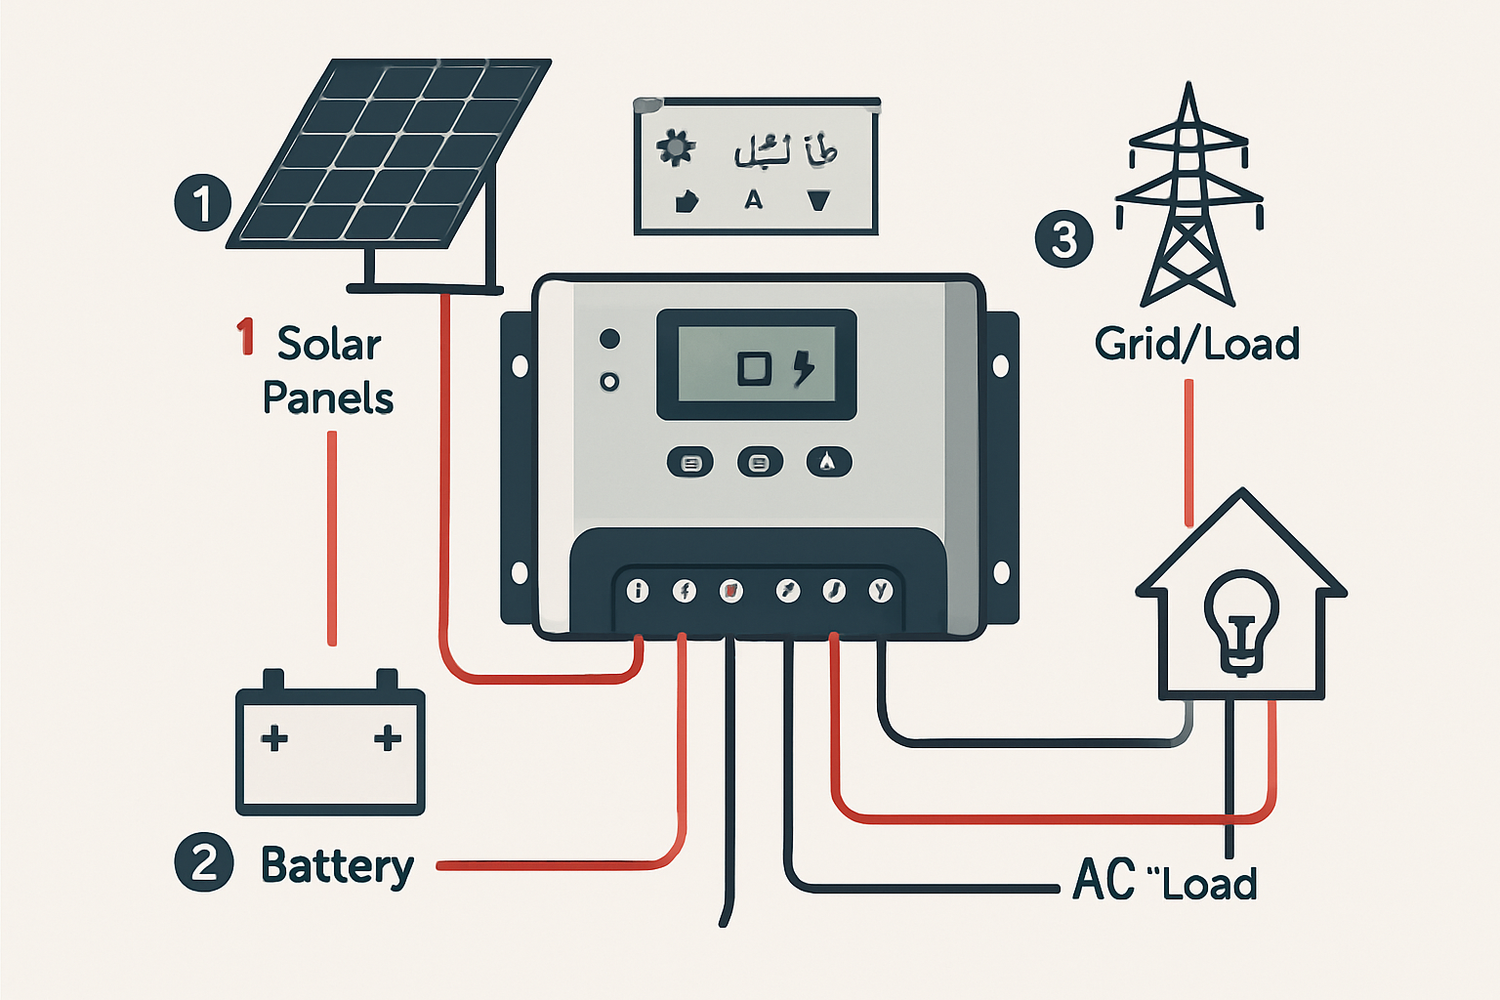
There is a specific, non-negotiable order for wiring a charge controller. Following this sequence ensures the controller can correctly auto-detect the system voltage from the battery and prevents damage from unregulated solar panel voltage.
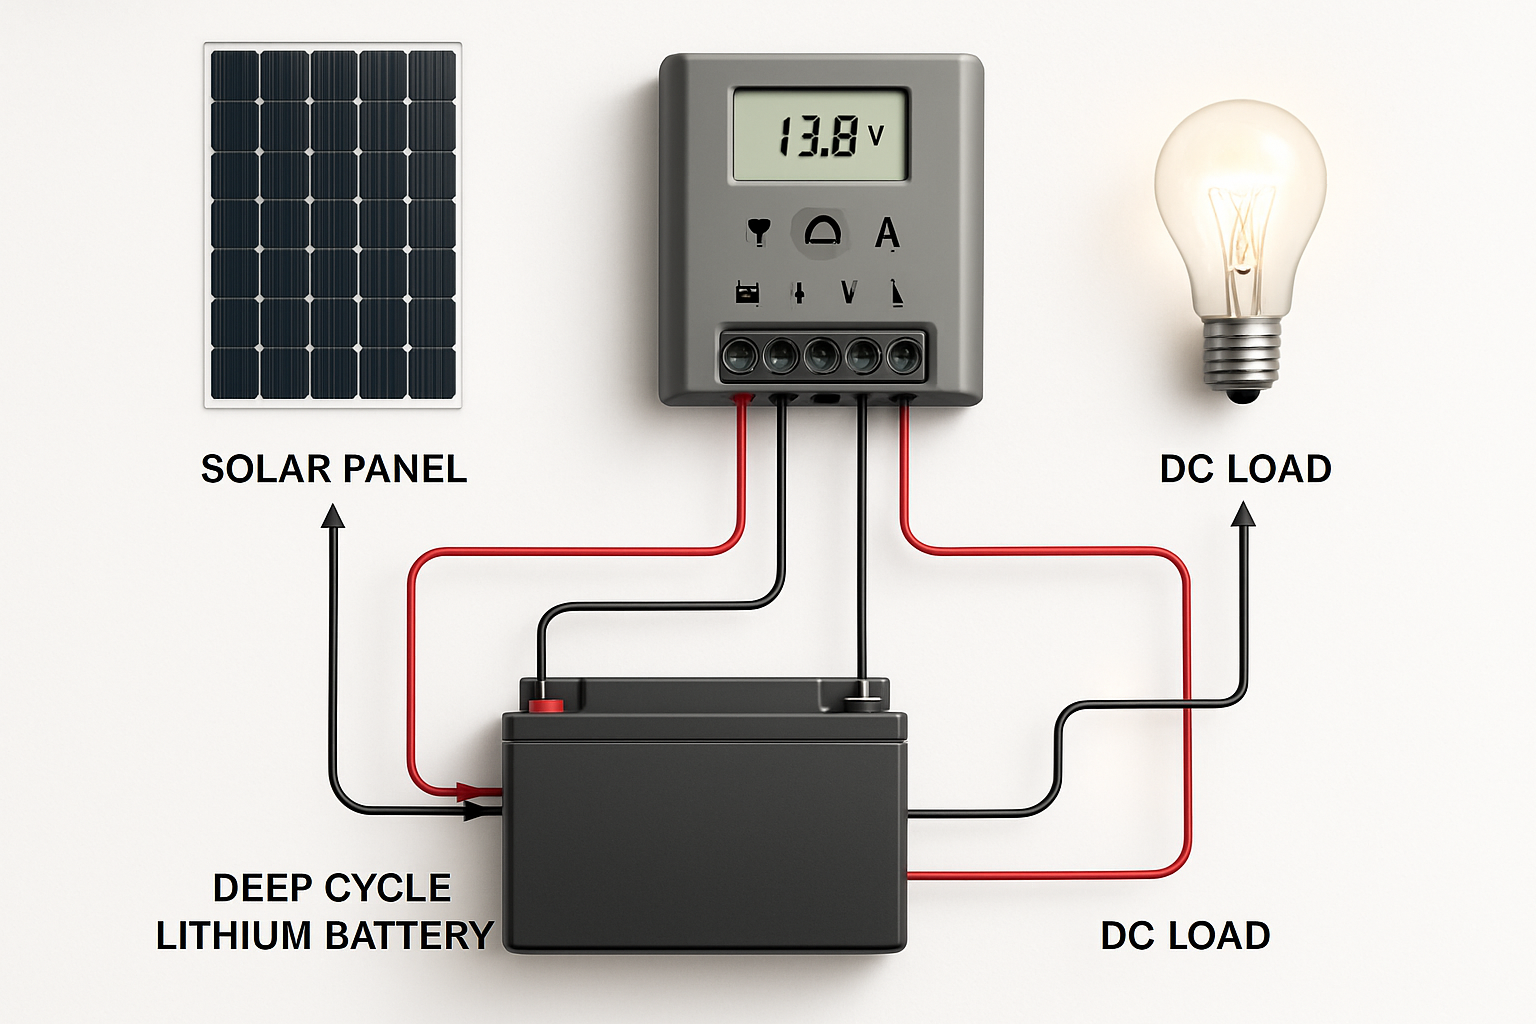
A. Connecting the Battery Bank to the Controller
This is always the first connection you make. It allows the controller to power up and calibrate itself to your system's voltage.
- Ensure the breaker between the controller and battery is open (off).
- Connect the negative (black) wire from the controller's battery terminal to the negative terminal of your battery bank.
- Connect the positive (red) wire from the controller's battery terminal to an in-line fuse or circuit breaker, and then connect the other side of the breaker to the positive terminal of the battery bank.
- Once connections are secure, close the breaker to power on the controller. The display should light up.
This process is fundamental for all battery types, including advanced LiFePO4 batteries. For specific insights, see How to Wire a Hybrid Controller to a 12V LiFePO4 Battery.
B. Wiring the Solar Panel Array
With the controller powered on and stabilized, you can now connect your solar panels.
- Keep the solar panel breaker or disconnect open (off).
- Connect the positive wire from your solar array to the PV+ terminal on the charge controller.
- Connect the negative wire from your solar array to the PV- terminal on the charge controller.
- Double-check the polarity with your multimeter before closing the breaker.
How your panels are wired together—in series, parallel, or a combination—affects the voltage and current delivered to the controller. This is a critical design choice you can learn more about in Series vs Parallel: Wiring a 12V 100Ah Lithium Battery. The International Energy Agency (IEA) highlights that as more distributed solar generation connects to power grids, proper integration becomes vital for stability. This principle applies just as much to a home system as it does to a utility-scale plant.
C. Integrating Grid and Load Connections
The final step is connecting the AC input and output, which gives the "hybrid" controller its name.
- Connect the utility grid power (or a backup generator) to the AC input terminals of the controller.
- Connect the wires that will power your dedicated appliances or sub-panel to the AC output terminals.
- These connections must be made following the manufacturer's diagram and all local electrical codes, often involving a transfer switch for safety.
Configuration and System Commissioning
With the physical wiring complete, the next critical phase is configuring the controller's settings to match your specific components. This step is what unlocks the full performance and longevity of your system, especially your battery bank.
A. Setting the Correct Battery Parameters
This is arguably the most important configuration step. Different battery chemistries have unique charging requirements. Using default settings meant for lead-acid batteries on a LiFePO4 bank can reduce its lifespan. Key parameters to set include:
- Absorption Voltage: For LiFePO4, this is typically set between 14.2V and 14.6V for a 12V system.
- Float Voltage: Often set around 13.5V to 13.8V for LiFePO4.
- Equalization: This should be disabled for LiFePO4 batteries as it can cause damage.
Pairing a configurable controller with high-performance ANERN LiFePO4 batteries ensures you can dial in the precise settings for optimal health and deep-cycle performance. To learn more, read about how to Unlock Peak Power: Wire Your Deep Cycle Lithium Battery.
B. System Power-Up and Initial Checks
Before putting the system into full service, run through a final checklist:
- With all breakers closed, check the controller's display. It should show voltage from the panels and the battery state of charge.
- Verify there are no error codes or warning lights.
- Use your multimeter to confirm the battery is receiving a charge and that the AC output is providing the correct voltage.
C. Monitoring and Optimization
Modern hybrid controllers offer monitoring via built-in screens or mobile apps. Use these tools to track your energy production and consumption. This data helps you make informed decisions to optimize your usage. The International Renewable Energy Agency (IRENA) notes that smart control and monitoring are essential for balancing power systems, a principle that scales down to home energy storage. Continuous monitoring helps you understand your power patterns, and for a deeper analysis, referencing benchmarks on solar storage performance can provide valuable insights into maximizing your system's efficiency. For more on this topic, consider if your Is Your Controller Wired for Optimal Solar Energy Storage?.
Avoiding Common Pitfalls and Troubleshooting
From my experience, most issues with new installations stem from a few common, avoidable mistakes. Knowing what to look for can save you hours of frustration.
A. Top Wiring Mistakes to Avoid
I've seen these issues in the field time and again. Avoid them from the start:
- Reverse Polarity: Connecting positive to negative. Always double-check with a multimeter.
- Incorrect Wire Gauge: Using wires that are too thin creates a fire hazard and reduces performance.
- Loose Connections: All terminal screws must be tight. A loose connection can arc and cause heat or system failure.
- Improper Fusing: Fuses and breakers protect your equipment and prevent fires. Do not skip them.
For a detailed list of what not to do, review these 7 Common Wiring Mistakes for Your Lithium Ion Solar Battery.
B. Basic Troubleshooting Steps
If your system isn't behaving as expected, start with the basics before assuming a component has failed.
| Problem | Possible Cause | Solution |
|---|---|---|
| Controller not powering on | No battery connection; blown fuse; reverse polarity | Check battery breaker/fuse; verify all connections are secure and correct |
| Battery not charging | Solar panels disconnected; incorrect settings; shading on panels | Check PV breaker; verify panel voltage; ensure battery parameters are correct |
| Low power output | Loose connection; incorrect wire gauge; dirty solar panels | Tighten all terminals; verify wire sizing; clean panel surfaces |
C. The Importance of Grounding
Proper grounding is a critical safety measure that protects you and your equipment from electrical faults and lightning strikes. Both the equipment chassis and the electrical system itself should be connected to a dedicated earth ground according to local codes. Adhering to established technical standards is essential for the safety and stability of the entire installation.
Wrapping It Up: Achieving Energy Independence
Wiring a hybrid charge controller correctly is a meticulous but rewarding process. By prioritizing safety, following the correct connection sequence, and carefully configuring your system's parameters, you build a reliable core for your home energy system. This setup is the foundation of a scalable solution, allowing you to manage power from multiple sources and take a significant step toward achieving energy independence. With a robust home battery storage system, you are not just generating power; you are taking control of it. For a complete overview, check out The Pro's Guide to Wiring Your Home Battery Storage System.


Leave a comment
All comments are moderated before being published.
This site is protected by hCaptcha and the hCaptcha Privacy Policy and Terms of Service apply.